A Dragon Head Craftivity! (FREEBIE!)
Have you heard the news? We've Moved to HeidiSongs.tv!
Our new website features an online video streaming service, updated blog posts at Heidisongs.blog, and a wealth of fresh resources designed to make learning even more fun and engaging.
You can also continue shopping for our educational products there and at our Teachers Pay Teachers store!
Head over to HeidiSongs.tv now and explore all the exciting new features.
See you there!
__________________________________________________________________________

This week, we made these CUTE dragon heads for our fairy tale unit! I was inspired after seeing them done on this blog post here. There were no instructions or templates, so I came up with my own. I'm loving the way they turned out and the kids had a blast putting them together!! I'm including the instructions and templates for you so you can make your own fire-breathing faces with your class, FREE!!! :)

Preparation:
Cut all of the paper pieces ahead of time: the head, ears, eyebrows, flames, eyes, and nostrils. Make sure that you pay attention to how many pieces of each item are needed per child. For example, each child will need two ear pieces, but only one head, etc.

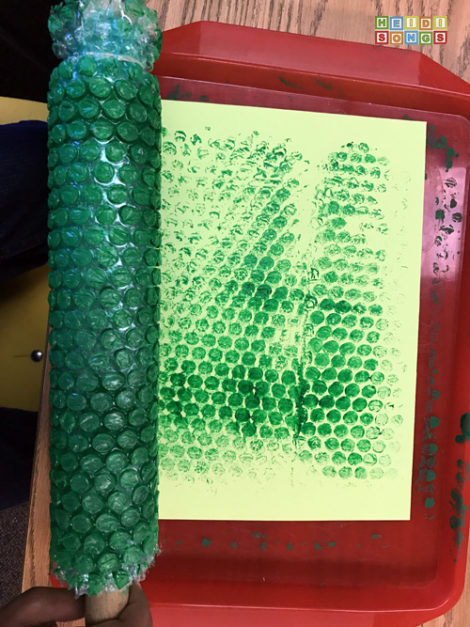
A. Paint the paper for the head using bubble wrap in advance in order to let it dry. If you copy the head shape onto the back of the paper, then you can paint the front of the paper on the other side. After the children cut it out, only the painted side will show, not the cutting lines.

In order to paint using bubble wrap, I recommend that you put the bubble wrap on a rolling pin from your kitchen, securing it with rubber bands. The children should roll the covered rolling pin in a large, shallow TRAY of green paint to get paint on it evenly, and then roll it onto a piece of light green construction paper. If you do not have a tray, then try using a paintbrush to paint the paint onto the rolling pin, setting the pin down onto a paper plate or a pie tin in between times. They should roll the pin just ONCE down the paper, not several times, or they will not get the same effect as is shown here. Note: There is STILL green paint from last year on my rolling pin, which doesn't seem to matter much because I really don't bake. But you may want to find an old cheap one rather than a really nice one before you put paint on it!
B. Duplicate the pieces for the ears, eyebrows, head, and flames. You could also just make patterns and have the kids trace them if you wish, of course. These instructions will assume that you copied them using a xerox machine of some type.
C. I recommend setting up the pieces in plastic tubs that are labeled with sticky notes that say what each piece is for, and how many each child needs. Once you have all of this set up, you’re ready to roll! Note: This project will only take about 20 minutes to complete, assuming that you have already painted the dragon heads in advance.
Procedure:
1. Head:
Cut out the head along the lines shown on the pattern. It should already be painted.

2. Nostrils and Eyes:
Both the nostrils and eyes are made from black squares or rectangles. All you need to do is round off the corners and glue them down wherever you would like them to be, keeping in mind that you’ll probably want the flames to extend off the edge of the dragon’s nose.
3. Ears:
Cut out the ears according to the pattern. Several of my kids confused the ears (or horns, as you may wish to call them!) with the eyebrows, so it might be a good idea to label them in their baskets, and keep your teacher sample handy for them to see. Glue them down as shown.

4. Eyebrows:
Cut out the eyebrows according to the pattern and glue them down as shown.
5. Flames:
Cut out the flames according to the pattern. You may wish to have the children color them red, or do some- thing else to make it look “fiery.”

We used a warming tray (from a garage sale!) and crayons to melt the red and orange crayons onto the construction paper. I would only recommend this if you had an aide or adult helper to help the kids do this one at a time, as that plate can get rather hot! We taught the children to hold the paper steady with an old chalkboard eraser.


To Display:
This dragon project was part of our Fairy Tale unit, and we displayed them with our knights, princesses, castles, and Fairy Tale Lapbook Book Reports! (Look for an upcoming blog post with the rest of these materials!!) To give the dragons a place to “hide,” we also made some “bricks” just by rubbing peeled black crayons on gray paper, and formed them into a “castle” around the windows. :)

I love the way each of these has it's own personality! The one above on the bottom right looks a little bit sad, and the ones in the middle look angry! The ones on the top left look a bit surprised, and the one on the top right looks like he is in a bit of a daze. They just make me laugh!
If you try these, I'd love to see pictures of how they turn out!! Click here to download a PDF of these instructions, as well as all the templates!! It's FREE! :) Enjoy!

And Happy Easter!
- Heidi
Are you on Pinterest?? Here's my Fairy Tale Unit Pinterest board for some more ideas!!
P.S. Sight Words 1-6 are ANIMATED!! Volume 3 includes some tougher words, like "there" and "their"! These songs are GREAT for teaching the difference between them! Look!
AND Don't forget all our videos are available to STREAM on UScreen, FREE for the first 30 days! It's an awesome way to bring some EASY, active learning to your students during this time, and they can always cancel right before they are ever charged, like on day 29! Check out the info page on our website for more info!
----------------------------------
Follow me! Did you enjoy this post? Do me a favor and share it with your friends! And follow this blog by signing up for my email updates here, and follow me on TPT! I'm also on Pinterest, Facebook, Twitter, Instagram, and YouTube, too! Don't forget to sign up for our email newsletter for special deals and promo codes that you won't find out about anywhere else.