TK Lesson Plans, Week Three: What’s Working?
Have you heard the news? We've Moved to HeidiSongs.tv!
Our new website features an online video streaming service, updated blog posts at Heidisongs.blog, and a wealth of fresh resources designed to make learning even more fun and engaging.
You can also continue shopping for our educational products there and at our Teachers Pay Teachers store!
Head over to HeidiSongs.tv now and explore all the exciting new features.
See you there!
__________________________________________________________________________
Here are some of my lesson plans for many of the fun things we have been doing in my TK class during the third week of school! This was the first week of Unit Two in Benchmark’s Ready to Advance for TK. I’m using the guided reading books and following their manual for the pacing of the standards, but mixing a lot of my own activities into it as well! By the way, I’m still totally in love with my grade level and my little TK babies! They are as sweet as punch and the best class I can remember in many years! TK ROCKS!
I still love Kindergarten, though, and I often remember how it was and find myself comparing the two grade levels. It’s definitely taking longer for some of us to learn certain things, no question about that! And their collective attention span is shorter than that of a regular Kindergarten class. Some of the children are more apt to cry to get their way then most Kindergartners were. And their bladders are smaller! LOL!
So here is what we did this week!
Learning the Letter A
This is a lesson format that I used to do all the time in Kindergarten when I taught the letters. It works great, but you have to keep the pace up so that it moves along quickly!
Step 1: Build the capital letter with sticks. First we built the letter with the sticks from our old Handwriting Without Tears Kit. I actually added magnets to the backs of the sticks so that they would not move around when the kids trace the letters, and that made a world of difference! They build the letters on steel baking trays so that the magnets stick, and then trace them, repeating the directions of drawing the letter. So for the capital A, we say, “Down, down, across.” After that, I tell the children to remove the sticks, mix them up, and see if they can remember how to build the capital A again!
Step 2: Build the lowercase letter with sticks. After that, we do the same thing with the lowercase A, saying “around and down” for the directions on drawing the A. As I go along, I keep asking the kids to tell me the sound of the A, and what letter it is, etc. Then collect up all of the trays and sticks and set them aside.
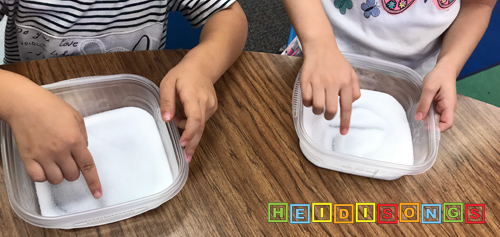
Step 3: Draw the letter in salt boxes. Next, we draw the letter in salt boxes! The kids love the scratchy feel of the salt. So we just repeat the same directions as before, drawing the letters in the salt boxes. FYI, these salt boxes are simply food storage boxes that I got at Target. It would be better to spray paint the bottom of them, but due to lack of time (and spray paint!) I just taped some black paint on the bottom of the boxes!
Step 4: Draw the letter on your friend’s back. After that, everyone turns to the right and draws the letter on the back of the person sitting next to them, repeating the directions as before and telling me the letter sound. Then when I tell them to turn around, they all turn to the left and draw the letter on the person’s back that is sitting on their left! You can also just assign partners, of course!
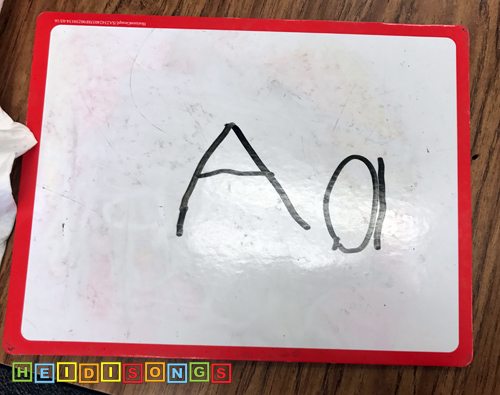
Step 5: Write the letter on dry erase boards. Last, I pass out dry erase boards and have the children write the letter a few times. Then as they are doing it, I go around the table and I hold up the letter we were working on. I ask the children individually if they can tell me the letter and sound, and can write it properly, they can draw on their boards. If not, they have to work on it with me a bit more!
Letters vs. Words Sort
I’ve been noticing that many children don’t seem to know the difference between letters and words, so I created a word and letter sort. I have a wonderful retired teacher friend and volunteer, “Miss Janice,” who did this lesson with my students at one of my centers. This is a surprisingly difficult concept! You might think that this lesson would be a “slam dunk,” but it sure wasn’t with my little cherubs! You can download it free here and try it if you like! I also made it into a “Bang!” game format as well, if you want to give it a try in a game format!
Apple Graph
We are learning about our senses, and so I decided to have the kids make an apple graph! I actually had a lot of fun re-creating and updating this graph that I always used to do with my kindergartners every year! I’m looking forward to sharing it with you today as a free download, too!
All I did was bring in three different types of apples- red, yellow, and green. We sampled them in small groups, and then I had the children put their names up on the graph under their favorite. When we were done, we looked at the graph and analyzed the results. Fun!
When we were completely finished, I cut off the extra grid lines that we didn’t use so it wouldn’t take up so much display space, and then put it up. Love it! You can download the apple graph right here!
Nursery Rhymes
We’ve progressed from “enthralled” to OBSESSED! And the class favorite song? You’ll never guess. It’s GEORGIE PORGY! I’m really not sure why, but I suspect that it’s the simplicity and the fact that they all like the “ran away” part at the end! Now, as we are walking down the (outside) halls on our way to meet their parents for dismissal, they want me to KEEP on singing all of the nursery rhymes that we have learned. It’s so dog-on CUTE, I can hardly stand it! LOL!
Roll and Count Game
This a fun little counting game that my teammate Jeff came up with! He gave the kids each a mat with some dots on it and dice with numerals drawn on. Their job was to roll the die, read the number, and make a tower with that many blocks on each dot. They needed to do that until all of the dots had a tower on them! The kids had a great time, and it was great practice for counting and number recognition!
Sight Words
We have continued to work on our sight words, singing the songs and dancing our little hearts out every single day! So far, we have learned the following words and songs: I, the, to, like, my, is, a, it, red, blue. I know that several of my kids can read some of them already, and some of them can read ALL of them already! And of course, I know that a few of my kids can’t read any! But that’s okay! We are going to keep plugging long.
On Thursday, I checked their progress by testing them on ESGI. I know it is early for assessing, but I am really curious to know who is picking the words up and who is not. Also, I’ll need to group them by achievement so that I can really slow down with those that need it. That’s what TK is for, right? <3 It was quite eye-opening to see which children knew the words, and which children told me “T-H-E!” (rather than the word “the,”) and which children simply had no idea whatsoever. I’m glad to have the information, regardless! I LOVE using ESGI!
See you next week!
– Heidi
----------------------------------
Follow me! Did you enjoy this post? Do me a favor and share it with your friends! And follow this blog by signing up for my email updates here, or follow on Bloglovin', or follow me on TPT! I'm also on Pinterest, Facebook, Twitter, Instagram, Google+ and YouTube, too! Don't forget to sign up for our email newsletter for special deals and promo codes that you won't find out about anywhere else.
I still love Kindergarten, though, and I often remember how it was and find myself comparing the two grade levels. It’s definitely taking longer for some of us to learn certain things, no question about that! And their collective attention span is shorter than that of a regular Kindergarten class. Some of the children are more apt to cry to get their way then most Kindergartners were. And their bladders are smaller! LOL!
So here is what we did this week!
Learning the Letter A
This is a lesson format that I used to do all the time in Kindergarten when I taught the letters. It works great, but you have to keep the pace up so that it moves along quickly!
Step 1: Build the capital letter with sticks. First we built the letter with the sticks from our old Handwriting Without Tears Kit. I actually added magnets to the backs of the sticks so that they would not move around when the kids trace the letters, and that made a world of difference! They build the letters on steel baking trays so that the magnets stick, and then trace them, repeating the directions of drawing the letter. So for the capital A, we say, “Down, down, across.” After that, I tell the children to remove the sticks, mix them up, and see if they can remember how to build the capital A again!
Step 2: Build the lowercase letter with sticks. After that, we do the same thing with the lowercase A, saying “around and down” for the directions on drawing the A. As I go along, I keep asking the kids to tell me the sound of the A, and what letter it is, etc. Then collect up all of the trays and sticks and set them aside.
Step 3: Draw the letter in salt boxes. Next, we draw the letter in salt boxes! The kids love the scratchy feel of the salt. So we just repeat the same directions as before, drawing the letters in the salt boxes. FYI, these salt boxes are simply food storage boxes that I got at Target. It would be better to spray paint the bottom of them, but due to lack of time (and spray paint!) I just taped some black paint on the bottom of the boxes!
Step 4: Draw the letter on your friend’s back. After that, everyone turns to the right and draws the letter on the back of the person sitting next to them, repeating the directions as before and telling me the letter sound. Then when I tell them to turn around, they all turn to the left and draw the letter on the person’s back that is sitting on their left! You can also just assign partners, of course!
Step 5: Write the letter on dry erase boards. Last, I pass out dry erase boards and have the children write the letter a few times. Then as they are doing it, I go around the table and I hold up the letter we were working on. I ask the children individually if they can tell me the letter and sound, and can write it properly, they can draw on their boards. If not, they have to work on it with me a bit more!
Letters vs. Words Sort
I’ve been noticing that many children don’t seem to know the difference between letters and words, so I created a word and letter sort. I have a wonderful retired teacher friend and volunteer, “Miss Janice,” who did this lesson with my students at one of my centers. This is a surprisingly difficult concept! You might think that this lesson would be a “slam dunk,” but it sure wasn’t with my little cherubs! You can download it free here and try it if you like! I also made it into a “Bang!” game format as well, if you want to give it a try in a game format!
Apple Graph
We are learning about our senses, and so I decided to have the kids make an apple graph! I actually had a lot of fun re-creating and updating this graph that I always used to do with my kindergartners every year! I’m looking forward to sharing it with you today as a free download, too!
All I did was bring in three different types of apples- red, yellow, and green. We sampled them in small groups, and then I had the children put their names up on the graph under their favorite. When we were done, we looked at the graph and analyzed the results. Fun!
When we were completely finished, I cut off the extra grid lines that we didn’t use so it wouldn’t take up so much display space, and then put it up. Love it! You can download the apple graph right here!
Nursery Rhymes
We’ve progressed from “enthralled” to OBSESSED! And the class favorite song? You’ll never guess. It’s GEORGIE PORGY! I’m really not sure why, but I suspect that it’s the simplicity and the fact that they all like the “ran away” part at the end! Now, as we are walking down the (outside) halls on our way to meet their parents for dismissal, they want me to KEEP on singing all of the nursery rhymes that we have learned. It’s so dog-on CUTE, I can hardly stand it! LOL!
Roll and Count Game
This a fun little counting game that my teammate Jeff came up with! He gave the kids each a mat with some dots on it and dice with numerals drawn on. Their job was to roll the die, read the number, and make a tower with that many blocks on each dot. They needed to do that until all of the dots had a tower on them! The kids had a great time, and it was great practice for counting and number recognition!
Sight Words
We have continued to work on our sight words, singing the songs and dancing our little hearts out every single day! So far, we have learned the following words and songs: I, the, to, like, my, is, a, it, red, blue. I know that several of my kids can read some of them already, and some of them can read ALL of them already! And of course, I know that a few of my kids can’t read any! But that’s okay! We are going to keep plugging long.
On Thursday, I checked their progress by testing them on ESGI. I know it is early for assessing, but I am really curious to know who is picking the words up and who is not. Also, I’ll need to group them by achievement so that I can really slow down with those that need it. That’s what TK is for, right? <3 It was quite eye-opening to see which children knew the words, and which children told me “T-H-E!” (rather than the word “the,”) and which children simply had no idea whatsoever. I’m glad to have the information, regardless! I LOVE using ESGI!
See you next week!
– Heidi

----------------------------------
Follow me! Did you enjoy this post? Do me a favor and share it with your friends! And follow this blog by signing up for my email updates here, or follow on Bloglovin', or follow me on TPT! I'm also on Pinterest, Facebook, Twitter, Instagram, Google+ and YouTube, too! Don't forget to sign up for our email newsletter for special deals and promo codes that you won't find out about anywhere else.


