Saturday, April 28, 2012

My Review of Talk Blocks from Learning Resources
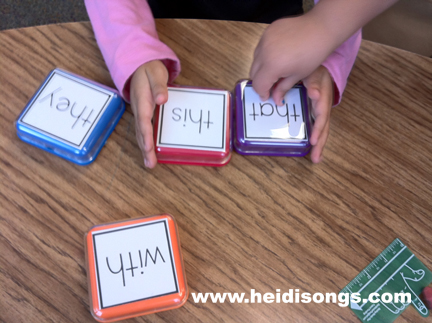
 I was excited to be given a set of these Talk Blocks to try out and review about a month ago by the good folks at Learning Resources! Talk Blocks are blocks with a removable cover and a little recorder inside, so that you can record anything you want on it! Then, all you have to do is push the button and listen to it!

I decided to use my Talk Blocks for language arts instruction; specifically, I used them at the writing table as a supplement to my word wall! I just printed out some words that the children were likely to need, and cut them to the correct size of the top of the block. Then I recorded my voice saying the word by changing the slider button in the back to "record" and pressing the button down. You continue to hold the button down as you speak, and then let go when you are finished. Then slide the button back again to "play" and then listen to your recording! If you like it, you're done! If not, then just slide that button back to "record" and try it again! No erasing needed; the recording automatically erases when somebody slides to button back to "record."

 My kids really LOVED to record their own voices, so I had the whole class say the word that I had written on the top of the blog! Then we all listened to it to check and see if it was alright. The only thing I found out that was necessary was to cover the slider button on the bottom with duct tape, because if the students start to "explore" the unit and sliding buttons around, the recording is instantly erased! I found this out the HARD way, LOL!

We used the Talk Blocks for several different lessons, but my favorite use so far was in conjunction with a writing project. I recorded and wrote on the tops of the blocks several words that I thought would be useful for the children, and laid them out on the table and let them use the Talk Blocks in conjunction with the Word Wall. If they weren't able to tell the difference between the words "they" and "that," for example, they could press the button on the Talk Block and listen to the word! Lots of children used the blocks for this purpose, and it really did help them complete their writing.

We brainstormed what we knew about flamingos first!
In case you are interested in the lesson that they were doing, we first read a non-fiction book about flamingos.  Then we made a list of things that we learned about them, and I taught them how to draw the flamingos in their journals.  The next day in small groups, I had them write a "big idea sentence" to get themselves started in writing about flamingos, such as, "I like flamingos," or "Flamingos are birds," or "Flamingos are cool."  Then they had to write at least two more "little idea sentences (or detail sentences) regarding something they had learned about flamingos.  This lesson follows the "Step Up to Writing" format that we are using in my district.  When I modeled what to do, I also marked my topic sentence with a green dot, and the supporting sentences with a yellow dot.  This is supposed to help the children organize their writing.  

The blocks themselves can, at times, be distracting from the task at hand.
 The idea of starting with a "big idea" rather than a supporting idea can be a tricky on one for the little ones, and I often had to help them erase and restart their little paragraphs, unfortunately.  My high group got it right away, other than being rather distracted from the task and preferring to talk and push the buttons on the blocks instead!  So I took away the blocks until they were needed and then gave them back when the time was right.
I also created a Sight Word Dice game, and had them roll a sight word, push the button, and color in a box for each time they rolled the word!  They had a good time with it, but on that particular day, my class was very rowdy and would not cooperate with playing the game nicely and sharing the blocks, so they unfortunately had to be taken away from some groups.  :(

We also used the buttons to record the children cheering, and then let them press the button when they turn in their homework for the week! It's very motivational, and the uses are really only limited by your own imagination. But watch out! To keep the noise level low, just make sure that your recordings are a bit "soft spoken," because if you have the children all shout something, then it will be recorded and play back VERY LOUD!!!!! 

I think that these blocks could also be used for dictation practice in a learning center.  You could record some sentences and have the children try to write them exactly as they hear them.  They could also be used to record the directions for a learning center, so that the children could hear the directions that they cannot read!  They could also be used for reminding kids of letter sounds, or the name of a number, etc.  Basically, you are really only limited by your imagination here!  Really, the only drawback to them is that the children just LOVE to push those buttons, and so they may choose to continually push the button rather than complete their work.  If so, you will probably hear it in the classroom and will need to have them bring you the block so that you can remove it.
This is a nice tool to have in your classroom or home school! The children love it and it's a fun addition to nearly any lesson. Just remember to save some money for batteries, because each Talk Block needs THREE AAA batteries! And because of that, I always turn the buttons to "off" when we are not using them.

Learning Resources Facebook Page - Click "Like" for give aways and grant info.
@LearningHandsOn - Follow Learning Resources on TwitterLearning Resources YouTube Channel - Subscribe for videos on products and "How To" videos submitted by teacher reviewers
Learning Resources on Pinterest- Good ideas and photos of products on Pinterest

These Talk Blocks record and play back 30 seconds of sound. With a removable clear top you can create pictures, symbols, numbers or letters to match your recording. The large size is ideal for young children.

Talk Blocks: A Wonderful Classroom Tool!
By Heidi of HeidiSongs from La Verne, CA on 4/28/2012
Pros: Creative, Easy To Assemble, Durable, Fun, Sturdy, Colorful
Cons: Battery Expenses
Best Uses: Lessons, Educational Games, Special Needs, Young Children
Describe Yourself: Parent Of Multiples (Twins etc), Working Parent, Education Oriented, Parent Of Two Or More Children, Kindergarten Teacher
Was this a gift?: Yes


By the way, Are you interested in applying for a Grant for a Now! Board from Learning Resources?

Learning Resources announces the sponsorship of a teacher grant hosted by WeAreTeachers. To apply, teachers must answer this question: “How would you use portable interactive technology to create collaborative lessons?” After the application process concludes, educators can invite colleagues to vote for their favorite lesson ideas. Each of the three top vote getters will win a set of three Now!Boards and three GeoSafari Tuff Cams, a prize package valued at $2,000. (The Tuff Cam is a video camera that is sturdy enough for little hands to use without fear of breakage from drops, etc.!)  Additionally, two merit-based winners selected by a panel of teachers will each win one now!Board and one GeoSafari Tuff Cam, a total value of $700. Teachers can apply for the grant online through May 22, 2012.

For more information and to apply for the grant, visit this link.
 

Friday, April 27, 2012

Finding Phonics Spelling Patterns EVERYWHERE!

This is a picture of a child adding highlighting tape to a chart I made for a lesson.

Today I am going to tell you how I taught my kids to find the Sounds Fun Phonics spelling patterns in just about everything that they see!  We have been using highlighter tape for this, and they absolutely LOVE it!  In fact, it is a favorite activity to do during their PLAYTIME, if you can believe it!!!  The children want to take the tape and wander around the room, searching for an "ing" or a "th."  In fact, I finally had to put the tape AWAY, because I was pretty certain that there were NO MORE "un-taped" words with spelling patterns left on the walls to tape, and plus- they were just about driving me cRaZy!!!!

The Sounds Fun Poster with Highlighting Tape On It
 This is how it all got started.  Recently, each grade level team at my school was given the opportunity to go on a "Learning Walk" through each of the classrooms in our own grade levels and watch one of our team mates teach a lesson.  (Yes, this was a bit stressful for some of us, and there was a bit of grumbling. But I've been through worse stress than that in the area of "being watched," so it wasn't too bad for me, thankfully!)

Our Color Words Pocket Chart with Highlighting Tape
 While we were there, I was also able to walk around and take some photographs of some interesting projects that I saw on the walls!  One of the things that I saw in one of my team mates' classrooms was the use of highlighting tape on a chart for shared writing!  It looked like they had written something together, and then looked for capital letters, words with the "th" sound, and perhaps also words with long vowels and/or a "Bossy E" in them. 

This is the chart that I saw in my friend's classroom.

I had seen this before, but never thought seriously about implementing it, but given how excited my students were about spotting the Sounds Fun Phonics spelling patterns here and there, I assumed that they would get a kick out of the activity!  So I decided to search for some of the 1 7/8 wide highlighting tape on Amazon, which I figured would be the cheapest place to buy it.  Actually, the cheapest place to get several rolls at once in a variety of colors turned out to be on a link that I found from Amazon, LOL!  The six rolls of highlighter tape cost me $36.50, plus $11 shipping.  I had to really swallow hard before I bought it, because that was nearly $50 bucks for TAPE, for goodness sake!  Luckily, I can write that sort of thing off of my taxes because I have my business; otherwise, I wouldn't have bought it.  But for the record, I think you could do this with Wiki Styx also.  Just "underline" each word with a certain color of Wiki Styx.  And if you are working on a chart paper that you can throw away, you could also just use regular highlighter markers or crayons and throw the paper away when you are done.

Highlighter Tape in Six Different Colors
Once the tape came in, the rest was easy!  All I had to do was tell them that I was going to put some tape on our calendar word "March" to help us read it.  First I taped up the "ar" Pirate on our Sounds Fun poster, and then I put the matching color on the "ar" of March.  I had the kids help me choose which of the six colors it should be.  Then I had them help me choose a color for the "ch" sound, and I did the same, first taping the choo choo train on the poster, and then using the same color on the "ch of "March."  Then we sounded out the word, using the Sounds Fun motions to help us!  It was easy!  For the rest of the month, each time we read the word, we stopped and sounded it out that way, (as long as there was time.)

Notice the days of the week with the "ay" covered with tape. 
"Spring" in the upper left corner also has tape on the "ing."
 After that, it was a natural thing to invite them to find more "ar"'s and "ch"'s, and watch while I added more tape to other words.  Then we started branching out into other sounds.  We always first designated a color for that sound on the poster first, and stuck to it every time.  I was only able to find six colors of tape online, so some of the colors had to be used twice.  No one seemed to care about that, though!

Months of the Year Chart with Highlighting Tape
The funny thing about this activity is that the children now CANNOT stop looking for these sound spelling patterns!  They tell me about them all the time, no matter what lesson I am giving.  They tell me about them in the titles of story books, and on the words on the screen of the Animal Cams that we watch as I am taking roll.  They point them out when I am giving a math lesson, if I happen to write a word.  They see them in the objectives that I post for the day.  They find them on the calendar and focus board for the day.  They will interrupt ANY lesson and tell me about them.  (It's getting to be a bit of a problem!)  

My Helper of the Day Bear with Tape.

They wander around the room at playtime and find them on the walls and on books.  They LOVE to use the tape themselves, but I don't let them very often, otherwise it disappears too fast!  I have let them do some taping at playtime, though, just because they are so "into" it.  I think that I am going to need to create a worksheet or something that has random words on it and see if they can use highlighters to find as many of the sound spelling patterns as they can!!!!

This is a chart that shows how to write a word like it sounds.  


This Lakeshore Sound It Out Digraphs puzzle is a great match for Sounds Fun Phonics!


Friday, April 20, 2012

S.T.E.M. Projects in Kindergarten Are SO Much Fun!


About a year ago, it was suggested to me by my supervisor at Staff Development for Educators (SDE) that I try to develop some STEM projects for my class and try to include them in some of the sessions that I present at their conferences.  (For a complete list of my upcoming presentations, please click here!)  My first thought was, “Uh... why would I want to teach about stem cells in Kindergarten?” And then my next question was, “What is STEM?”  (Unfortunately, this only revealed my own ignorance in the subject, LOL!)  For those of you that are still in the dark regarding this topic like I was, the term “STEM” in relation to edu-speak refers to projects that integrate all four of these subjects:  science, technology, engineering, and math.  Hence the term, STEM!  So for the purpose of this blog post, this discussion has NOTHING to do with stem cells at all, thankfully!  And as far as the “engineering” part of it is concerned, all the children have to do is simply build something.  SO..., in this project, they would need to use the scientific method, and perhaps hypothesize, predict, conclude, etc.  They would need to use technology in it somehow, such as a camera, iPad, document camera, etc.  They would need to build something, or try to “invent” something.  And then they would need to use their math skills somehow, by counting, estimating, sorting, dividing (sharing equally), etc.  According to SDE, there is grant money out there for teachers that create STEM projects!  Hmm, very interesting!!!  Now I just need to figure out where to apply for it!!!!
Some of the children made VERY large cubes!
A school project that integrates science, technology, engineering, and math is very often a project that takes time and is spread out over a good week or two, at least in the higher grades.  The thing that I don’t like about this approach in Kindergarten is that it just seems to me that the more you spread a project out over several days, the more abstract it becomes to their little minds.  For young children, I prefer projects that can be started and completed in just one sitting.  So when I saw the idea for this project on the Science Sparks blog, it occurred to me that with just a few tweaks, this could qualify as a STEM project that could be completed in one day, so I was excited to try it!

One student made this fabulous house!  She told me that it was the
"Leaning Tower of Pisa!"  LOL!
To give it a try, all I did was buy a large bag of mini marshmallows and a medium sized bag of spaghetti noodles.  Actually, when I was at the grocery store, I was afraid that I would run out, so I bought two bags of marshmallows.  It turned out that one large bag of marshmallows and the smallest available bag of spaghetti noodles would have been plenty for 24 children.  I also let the kids eat five mini marshmallows each, in addition to creating their structures, and we still didn’t quite use up all of them!  So I decided that we could do the project twice, and we STILL didn't use up all of the noodles!

Another child made this structure that resembles a pyramid.
On the first try, I made one marshmallow and spaghetti “house” ahead of time and showed the children my sample.  Then I got out my document camera and made a cube underneath it so that everyone could see what I was doing and how I did it.  We talked about how to make it sturdier, and how builders make houses so that they will stay up.  (It’s the diagonal posts in the structure that make it sturdy!)  Once I added some diagonal spaghetti noodles to my cube, the whole thing stayed up straight and tall with no problem.  Then we counted how many marshmallows we needed to make a cube, and discovered that we only needed eight.  I think that this is a good precursor for them to start counting the vertices (corners) in the geometric solids, which I know is something that they will have to be able to do in the higher grades.  Despite the fact that I modeled how to make a cube, I told them that they could explore the materials and make anything that they wanted.  When they were finished, I gave them a lunch bag with their name on it so that they could save their structures and eat them at recess or lunch.  It's also worth mentioning that this project creates a BIG mess, and you WILL need a broom to clean up all of those broken spaghetti noodles that land on the floor!  It really looked like a bomb with dried spaghetti inside of it exploded inside my classroom around the table for this project!

Here is a cube that a child made with some diagonals for strength.
 The second time we did it, I gave them the assignment to make a cube.  I asked them to predict how many marshmallows it would take to make a cube, and they took a few guesses.  (There's the science bit!) Then I modeled how to construct one, but told them that they could do it in any way that they wanted.  (Building is the engineering part!)  We counted the number of marshmallows that my cube required.  (There's the math part, along with the geometry of the cube.)  Then I told them that they were allowed to make anything that they wanted, but if they made a cube, I would let them take a picture of it with the iPad(There's the technology part!)  Then I turned them loose and let them try it.  Luckily, there was a wonderful retired teacher volunteering  there with them, so that really helped, especially with the picture taking part!

This is my sample cube, made with diagonals for strength.
My wonderful volunteer also gave me some insight afterwards on the techniques and struggles of the children.  As I have observed many times before when we have made clay objects, you can get an entirely different view of the children when you give them a creative assignment such as this!  One of my highest functioning students informed me after I gave the directions that he didn’t want to do this!  I was a little surprised, because he is so successful at everything he does!  But the volunteer told me that he simply gave up in the middle of the activity.  Yet another little boy who struggles in some subjects really excelled in this project!  He gave it some thought and decided to give his cube double walls of spaghetti to make them extra sturdy, and then ALSO add the diagonal posts required to make it strong.  Then he used extra marshmallows on it to make sure that all of the extra pieces of spaghetti would stay put!  WOW.  I am guessing that THIS is why there are grants out there for teachers to develop STEM projects; to encourage and develop the talents of students like this!  Here is a child that can think outside of the box and keep trying things until he gets it right.  Bravo!  But how would I have ever known that he had those skills without a project like this?  Especially since this particular child doesn't always excel in language arts and usually does average work in math?

This is the large cube made with double walled spaghetti noodles, diagonals,
and extra marshmallows for strength!  A Kindergarten student did this all by himself.
One of my youngest, shyest little girls made nothing at all on the first round; she just said that she couldn’t.  On the second round, she worked very hard, and made a square!  It was not a cube, but a flat, one dimensional square.  But considering that on the first try she just basically explored the materials and constructed nothing, I was satisfied with that!  Besides, my volunteer told me that she had worked very hard to make that square!  So we have to consider that she did show some growth in her attempts to improve.

Pin This to Pinterest!!!
Each time we did this, one of my students asked me if it were possible to make a sphere.  This led to an interesting discussion about why this wouldn’t be possible.  I pointed out that every piece of spaghetti was straight, and that a sphere was round all over.  Plus, if you bend the spaghetti very much, it will break!  I did, however, get out one of my interesting balls from my ball box, which is known as a Hoberman Sphere.  It is a sphere made out of straight sticks, and it can collapse and expand.  Sometimes I throw it to a child that is really paying attention, as a motivator to the other children to try a little harder.  But I guess that we had never before discussed that this is actually a sphere made out of straight sticks!  In any case, I told the children that it would be possible to create a sphere out of straight sticks and marshmallows, but it would take a LOT of work, and it probably wouldn’t be possible in the amount of time that we had!

These are some pictures from our first attempt at making marshmallow structures!  Pin me!

I loved the results of this activity!  I would love to think of some more STEM activities that are Kindergarten appropriate!  Do you know of any?  I did find one Kindergarten STEM site with lots of activities on it, but I would like to find more.  Can you share them by leaving a comment?  (I love comments!!!)  Thanks!
Heidi

Sunday, April 15, 2012

The Easi-Speak™ Digital Microphone is FUN!


The Easi-Speak USB Recorder is FUN!
I teach Kindergarten, and I was very pleased to be asked to review this unique little product via email from the good folks at Learning Resources! When I received the Easi-Speak Digital Microphone free from Learning Resources, I was surprised that it really looked like a toy! But it is much more than that. In my classroom, we have had gotten into the habit of recording our voices and making movies of ourselves reading using my iPads. Having this little Easi-Speak has given me an extra tool for that purpose! Of course, it does not take video, but it does record the children's voices and allow them to hear themselves reading the passages back again. This is an extremely motivational activity for children that may not have previously cared much whether or not they could read a certain book with fluency, because once they get a chance to record their voices and listen to it played back, they are suddenly VERY interested in getting it RIGHT! 

When you take off the cap on the end of it, you find a USB port for charging!

Of course, you can do the same thing with an iPad or an iPod, but at a much higher price. Many teachers also would be far too nervous that their students would break these expensive items to actually turn the kids loose with them! There doesn't seem to be any chance of this happening with the Easi-Speak! The worst thing that could happen is that they might drop it, (at it did drop, in my room!), yet nothing bad happened to it. It kept on working, same as always!

It charges up fully in four hours. 

The other thing that happened was that the children were playing with it at playtime, and it did finally get "full" with recordings and so the children couldn't record any more. It took me a few minutes to read about how to efficiently delete all of the recordings at once, because I knew I didn't need to save any of them.  (But I could have taken those audio files and done something with them, if I had wanted to!)  It turned out to be very easy: I popped it into my Mac computer, opened up the folder, and dragged all of the recordings in it to the trash! An added bonus for me was that it really did work on both my Mac at home and my PC at school. Go figure! That almost NEVER happens!
My kids love this great tool! And I LOVE that I never have to buy batteries for it!!! Hooray!


Pros:
- Charges in USB port

- Motivational
- Kids love it
- Sturdy design
- Rechargable battery
- Easy to use

Cons: 
- Can get "full" of audio tracks and then won't take any more until all are deleted

- Easiest to delete files on the computer
- Does not amplify the voice.  It's not like a Karaoke microphone.

- Tricky to change tracks

Best Uses: 
- Motivating kids to read,
- Motivating kids to talk
- Teaching kids to share

Heidi Butkus
http://heidisongs.blogspot.com
http://www.heidisongs.com

Friday, April 13, 2012

Helping Kids Conquer DIBELS!!!

Do you DIBEL?  Do you want to DIBEL?  Do you HAVE to DIBEL?  In my district, we now officially do DIBELS at all elementary schools.
DIBELS stands for "Dynamic Indicators of Basic Early Literacy Skills" and many, many school systems are now using these tests as a measure of how their students are doing in reading, and as an identifier of students that may be "at risk."  Children that are considered "at risk" are those that, according to research, are most likely to possibly fail at some point in their school careers.  Therefore, extra assistance is often suggested in order to prevent such failures.

We now use the "DIBELS Next" assessments in my district.
The new "DIBELS Next" assessments are now part of my school life, and seem to be the hot topic at lunch and at grade level meetings.  Why did some of the children do poorly when they have done so well in assessments done by their own teachers in class?  What went wrong, and why?  And for those children that did well, what was it that made the difference?  And most important of all: what is the best way to help all of the children improve on these assessments?
In my district, test proctors are sent in to test the children each trimester so that the tests will all be given uniformly and equally.  That way, the scores can be compared without fear of bias of any kind.  Also, no instructional time is taken away due to the teacher having to administer these tests.  And I can certainly appreciate these things!  The only problem is that there are many factors about the tests that are unknown to the teachers.  These are some of the unknowns:
1.  The quality of the proctors may or not be equal.
2.  The proctors may have varying levels of interest in seeing that the children do well on the tests.  After the proctor has given her 100th test, does she really care how the child did anymore?
3.  Did the proctor try to get the child's attention before giving the test directions?  This is very important, since the directions can only be given one time.   Also, if the child doesn't view the proctor as an authority figure, then he or she may not feel compelled to really pay attention and try.  So if the proctor doesn't insist that the child pay attention and try, then some of them just might not. 
4.  Did the proctor score the tests and enter the scores into the system correctly?  Were there any mistakes that happened at that point?  We wondered about this, because some of the children's scores simply didn't make sense to our team.

One of my team mates decided to read as much of the DIBELS Next manual as she could, and figure out the testing process as much as possible.  And my hat is truly off to her, because it was a VERY time consuming process!  It is because of her that I managed to figure much of this out, so thanks so much to my good friend Tammi!
First, if we are going to do better on the tests, then we need to know exactly what is on those tests.  It's also important to memorize those acronyms, which are ALL OVER those tests and the accompanying graphs that come with your scores!
Here are the tests that they must "conquer."  Each one of these is a one minute timed test!  I have found, when giving children timed tests, that some of them will spend the entire 60 seconds just staring at the sand falling down inside of the egg timer, so now I use the timer on my iPhone, which is a lot less distracting, ha ha!  Actually, I think the fact that they are pressured to perform with a timer is much of what makes these tests so hard on little children and causes some of them to "freak out."  I also wonder at the developmental appropriateness of timed tests such as these for children as young as four and five years old.  I'm guessing that the NAEYC might have some strong opinions about this....

First Sound Fluency (FSF)
Children listen to a word and give the first sound that they hear in it.  This includes words that begin with digraphs (sh, ch, wh, th) and consonant blends (words like "spin," "flight," and "nest").  In reading through the manual thoroughly, we discovered that children are NOT to be penalized for speech problems or other articulation delays, such as making the /w/ sound in place of the /l/ sound.  (This again made us wonder how the test proctors could possibly know which children have speech issues and if they then scored them according to the directions.  But then is our first year as a district working through this process, and I'm sure we will all work through these issues eventually, though!) 

Letter Naming Fluency (LNF)
Children need to look at the letters in random order, and mixed up with capitals and lower case letters, and identify them as quickly as possible.  To practice this, I made a power point presentation of the alphabet in random order, and have the children try to name the letters as I click through them as quickly as possible.

Phoneme Segmentation Fluency (PSF)
Children listen to a word and must give "all of the sounds that they hear in a word."  These words include digraphs (sh, ch, wh, th), diphthongs (ou, ow, ay, oy, etc.), r-controlled vowels (words like "card" or "park,") and words with blends (words like "spin," "flight," and "nest").  I did not notice any multisyllabic words on the list, though.

Nonsense Word Fluency (NWF)
The children are given some nonsensical consonant-vowel-consonant (CVC) words (such as "mup") and some vowel-consonant (VC) words to read (such as "uv"), and they are supposed to try to read them without first saying the sound of each letter aloud.  If they can read the word fluently, without stopping to say the letter sounds and blend it aloud, then they are given a point for Whole Words Read (WWR).  They are also given a point for each of the Correct Letter Sounds (CLS) in each word.  If the child cannot read any of the nonsense words, then he can still get points for the correct letter sounds.  It is important to understand that the child is actually penalized for giving each letter sound aloud before sounding out the word!  They get no credit for having read the word at all if they give each letter sound and blend it together out loud before giving the word.  They have to do it all in their heads before giving the nonsense word.  
This rule is about as close to NONSENSE as I can think of, if you ask me!  I wish I understood why this determination was made, because we spend HOURS trying to get the children to blend the words aloud, and now they are NOT supposed to do it!  In fact, very often if the children refuse to blend the sounds aloud, what usually happens is that they GUESS at the word they are trying to read and get it WRONG!  So go figure!  I assume that they are going for the fluent reader and while I applaud this, I still think that it would be okay to give credit for the words read, even if they blended them aloud.  The children that read the words fluently will read more of them because they read them faster and get more points, right?

More Useful Acronyms to Know  (MUAK LOL)
The first time I downloaded the DIBELS graphs of my students' progress and looked at them, I stared at them for about ten minutes and tried to figure them out.  It wasn't so much the graphs that were confusing, it was the CONSTANT and COMPLETE use of acronyms without a single key or clue to what they meant anywhere on the graphs, even on the titles!  I actually threw the first set of graphs away because they were so useless to me.  Later when I went to a grade level meeting, we had to download and print them again and look at them.  That's when I found out what all of the acronyms stood for.  So here's a little bit of help for all of you that may be struggling with the same issue.  You can thank me now.  :)

DIBELS Composite Score (DCS)
This is not a test, but an average of all of your DIBELS scores.  You'll find it on some of your DIBELS graphs.  I just thought I would let you know what it means so that you don't have to spend a half an hour trying to figure it out. 

Likely to Need Core Support (CS)
Translation:  The child hit the benchmark and is doing great!

Likely to need Strategic Support (SS)
Translation:  The child did not hit the benchmark but is not at the rock bottom, either.  Could be worse!

Likely to need Intensive Support (IS)
Translation:  Bad news.  The child is in the very bottom third of the group and signs point to future failure in language arts unless you remediate NOW!


Even though our school's average Kindergarten scores were actually pretty good, we thought that it would be good to improve as much as possible.  Here are the things that we decided to do as a team to help boost our DIBELS scores for the next round of tests:

 1.  Phonemic Awareness and Phonics Instruction
We already are working with our required programs of SIPPS and the Michael Heggerty Phonemic Awareness book, which we try very hard to work in daily.   This Heggerty book only takes about ten or fifteen minutes to get through, by given the short attention span of the average Kindergartner, this can be an issue when you also have lots of other things to cover!  But we have decided to make it a priority, and it really does seem to help.

Michael Heggerty's Phonemic Awareness Kindergarten Level Book
The SIPPS (This stands for Systematic Instruction in Phonics and Phonemic Awareness) program helps kids learn to blend sounds into words quite well, but it seems to need a bit of supplementation in the area of phoneme segmentation with the diphthongs, digraphs, blends, and r-controlled vowels.  Or at least, let me put it this way:  MY class needs more practice this year than they are getting in just the SIPPS book, LOL! 

SIPPS Manual with Colored Tabs for Each of My Color Groups
It also doesn't introduce nonsense words, so we have had to find other ways to work on that.  For more information on that, see these blog posts:  (Several of them have free downloads on nonsense words in them, too!)  By the way, we are working on a new great download of Color-by-Nonsense Word Worksheets!  Hopefully it will be done really soon!

Gone Fishin' For Nonsense Words!
More Tricks for Sounding Out CVC Words  (See Section 7)
Sounding Out Nonsense Words and CVC Words
We're Bugging Out All Over!

At my school, we are all also using my CVC Book and the Sounds Fun Cards, Poster, and DVD.  I think that these things have really helped a lot!  The CVC book helps get the kids sounding out real words, and gives them lots of practice in this area.

Flash Cards from HeidiSongs CVC Book
The Sounds Fun Cards, Poster, and songs really do help the children isolate and chunk the diphthongs, digraphs, and r-controlled vowels as unique sounds, I think!  This is probably because there is a motion to go along with each sound.  Often, when we hear the sounds as we segment the words, the children will say, for example, "Oh, it's the /ch/ sound!" and make the choo choo train motion.  What Sounds Fun does for phonemic awareness instruction, (I think,) is help the children identify and classify diphthongs, digraphs, and r-controlled vowels as real and identifiable sounds that they can even write down, just the same as they would of any of the other regular 26 letter sounds commonly taught in Kindergarten.  I think it has made a HUGE difference! 

Sounds Fun Poster, Mounted on a Tri-Fold Presentation Board
2.  Practice, Practice, Practice!
If this is going to work, then you have to know what is on those tests.  We also have decided that the children need to be familiar with what the tests look like so that they don't freeze up when they see them!  It's bad enough that they get pulled out of class by a stranger and are given these tests.  They need to be familiar with what is coming.

For Practicing Nonsense Words:
I created a practice page that looks just like a DIBELS nonsense word test that I could project up on my big screen and have the whole class practice at the same time.  I can also use it as an informal assessment if I want to torture myself and my students with more testing.  I am giving you this as a free download here today, just in case you want to try it, too!

For Practicing Segmentation and First Sound Fluency:
I pulled together a list of words that included initial and final blends, digraphs, and diphthongs, and r-controlled vowels for practice in segmentation and first sound fluency that you can find here. We found that it can be pretty tricky for the children to pick just the FIRST sound off of a word when there is a consonant blend at the beginning of it, such as in a word like "flip."  They want to tell you that the first sound is "fl" rather than /f/.
Also, our kids get very good at segmenting three letter words, but then get lost when segmenting longer words.  So practicing segmentation with longer words is a must!  I have found this list to be valuable when practicing blending as well.  All of this gets tedious at times for the kids, so you may want to throw in some active responses!  For example, have them pull their hands apart in the air or slide their hands down their arms when segmenting words.  My friend Tammi has her kids stop at the shoulder, elbow, and wrist when they get to each sound to help them "feel" it as a break in the sound.  I'm going to try that one next week!

3.  Prepare the Kids for the Testing Pull Out
We decided that we need to really know what the children will be tested on before they get pulled out, and make sure that we have practiced it daily during the week previous to the test.  This needs to be done right off of the practice pages that I created that look like the test.  That way, the testing page itself should look familiar to them and the freaking out will be minimal!  And, that way, when the children get pulled, they should already know what the directions are, so it shouldn't matter too much whether the child is paying attention when the directions are given or not!  They ought to already know what the directions are- HOPEFULLY!


Finally, I just want to give a big SHOUT OUT to all of new blogger friends that I met at the Great Blogger Meet Up of Southern California!  I couldn't believe how much fun it was to sit and talk to all of those wonderful teachers that I had never even met before!

The BIG Group of Bloggers- about 20 People!

I think that I could have sat there for a couple more hours and not have gotten tired of it, but I knew that I had to fight the traffic home for an hour and I still had other things to do, so I just HAD to go!  I'm sure that our waitress was getting tired of us, too, since we had already been there for three hours, LOL!  Here is a short list of just SOME of the wonderful people that I finally got to meet in person, and links to their blogs!

A Few More of the Wonderful People I Sat By!
Kristin:  ATeenyTinyTeacher.blogspot.com
Annie:  MoffattGirls.blogspot.com/
Kristina:   ittybittypieceofme.blogspot.com
Tammy & Christy:  Flutteringthroughfirstgrade.blogspot.com
Michelle:  applesandabcs.blogspot.com
Sandy:  SoaringThroughSecond.blogspot.com
Traci:  DragonfliesInFirst.blogspot.com
Hadar:  MissKindergartenLove.blogspot.com
Rachelle:  WhatTheTeacherWants.blogspot.com
Kathy:  ColorOutsideLines.blogspot.com
Lindsay & Kerri:  TeacherBitsAndBobs.blogspot.com
Gwyn:  Preschool Printables

Friday, April 6, 2012

Loose Tooth Subtraction!

Today I am going to share a cute little subtraction activity that I made up a couple of weeks ago that is similar to the Shark Teeth Addition that I made up last year, but this time uses kids rather than sharks and is for subtraction rather than addition!  I hope you enjoy it as much as my kids did!  There's even a free download in it for you!

Sunset in San Diego, CA!
And if you are on vacation this week, then Happy Spring Break to you!!!!  I, too, am very happily on Spring Break this week, and I have to say that it is SWEET!

CA teachers got into Sea World FREE this spring!

My husband and I spent a couple of days on a little getaway in San Diego, and got to go to Sea World on one of our days away.  We have been there lots of times, but it is always fun!

I love those friendly dolphins!!!!

We also visited Balboa Park on the other day, and had a couple of nice dinners.  Just the weather alone is worth the trip to San Diego! 

Gotta love that perfect San Diego weather!!!
For those of you that missed the Shark Teeth Addition activity, it was simply an addition lesson in which the children rolled dice or used a spinner to determine how many teeth to draw on the upper and lower jaws of the shark.  Then they counted the total of the teeth and wrote an equation.

The Shark Teeth Addition Activity, done with real manipulatives rather than hand drawn teeth.

There are some worksheets that go with it.  The first activity was a free download, and then we created more of them and made them available for purchase as the demand for them became known.

The Loose Tooth Subtraction Activity

In my new Loose Tooth Subtraction Activity, we start with a picture of a child with ten teeth.  Then we roll a die to see how many teeth the child would loose.  We then black out that many teeth to show that they have been lost, and write the equation.  This activity is not as open ended as the Shark teeth addition activity, because of the need to draw the teeth in from the very beginning, and them black them out.  It seems to me that we could also use the triangle pattern blocks for teeth in the kids mouths, but I am afraid that they would end up looking like vampires or monsters, LOL!


The only trouble that we had with the activity was that the girls ALL insisted on having the picture of the little girl with the bow in her hair!  So I went back into all of the drawings and added a bow to all of the girls' heads so that this would no longer be an issue.  We cannot have girls without a bow, now, can we?????


This activity was better for the children that were struggling with subtraction than those higher functioning children that were already transitioning well from doing addition exclusively.  For those lower children, the fact that the first number was always ten made things simpler.  In contrast, this made it a little more boring for the higher children.  So for these children, I decided to make some pictures of kids with no teeth at all, and let them both draw the teeth and black them out as well.  This leaves the equations much more open ended and allows more freedom for the teacher to challenge the children that learn a little faster.


I hope you enjoy this free download!  Meanwhile, here are a few other things that we did this past week!

We made sponge painted prints out of some egg and flower shaped doilies I found at the dollar store!

All we did to prepare was put a small amount of glue stick in the middle of the doily to hold it in place while it was painted.

 
We did a nonsense word coloring activity that was a free download on my blog last year!


Watch for more of these great Color By Nonsense Word Worksheets soon!  We are working on them!