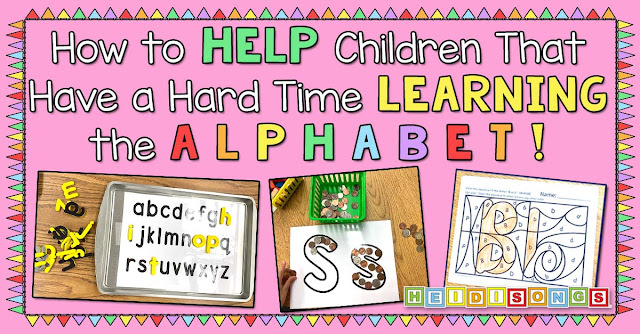
Fun with STEM: A "Punkin Chunkin" Catapult with Craft Sticks!


1. Tape two jumbo craft sticks together on one end.
2. Use a hot glue gun to glue a water bottle lid onto the top of one of those craft sticks. Leave enough space on the edge for a finger to pull the catapult back.
3. Tape six jumbo craft sticks together on both ends.
4. Pull the first two jumbo craft sticks (with the lid glued on) apart, and push the stack of six taped sticks in between them.
5. Place a pompom in the lid. Pull the stick back with your finger and let it go! Watch the pompom fly!
1. Hot glue a water bottle lid to one jumbo craft stick per child.
2. Make a zip baggie for each child with seven jumbo craft sticks in it, plus one of the sticks with the lids glued on.
3. Add some pompoms to the bag. I put in four different sizes of pompoms to let the children experiment and see which ones would fly the farthest. (Can't afford pompoms? Marshmallows will also work- but the mini ones will hit the ceiling if you launch them inside!)
4. On the day of the lesson, get either a child helper or a volunteer to tear off lots of long strips of masking tape and put them along a counter top so that they are ready. Our strips were about 18-24 inches long each.
5. On the day of the lesson, set up a measuring station somewhere (ours was outside on the playground. The fifth grade buddies did it! They drew two rectangles on either side of a white line on the playground, and then measured off ten feet in one foot increments. The reason why there were two rectangles was because that way, we could have two teams of kids launching the Punkins at the same time.
6. Get a class list on a clipboard ready, so that you can have one of the older children write down the length each Punkin flew.
This is how I gave my class the lesson. I'm sure that there are many ways to give it, but this is how I approached it, step by step.
1. I first showed them my working prototype and explained that one holiday tradition we have here in the United States is having "Punkin' Chunkin" contests in which people make different kinds of catapults and see how far they can make their pumpkins fly! (I looked for a good YouTube video example, but really didn't find a good one!)
2. Then I demonstrated how my own little mini "Punkin' Chunker" worked, and of course when they saw it, they all just went BONKERS! (The first thing they wanted to know was if they got to KEEP the one they made, and I told them yes.)
3. I explained that the real name of my Punkin' Chunker was a catapult, and people used to use them long ago for self-defense.
4. I showed them how to make their own catapult, step by step.
5. Then I told them that they would each get a bag with eight jumbo craft sticks (one with a lid already hot-glued on,) and four different sizes of pompoms. They could make their catapult in any way they liked, but the goal was to make a pompom go as far as possible.
6. I also told them that they could try to make their catapult even better by using more sticks, but that they would have to be smaller sticks, since that is all I had. So I showed them two more boxes of regular size craft sticks and mini craft sticks, and told them there were enough mini craft sticks for each group to have ten, and enough regular sized sticks for each group to have a handful.
7. I gave them a time limit of 20 minutes to create before they needed to go get in line to launch their Punkin and get a measurement. Each group was allowed to launch a pompom three times and then take their best measurement. Groups were also allowed to go back and modify their catapult and try again, if there was still time.
8. When the twenty minutes was up, there was a LOT of moaning and groaning! The children were having a WONDERFUL time playing with the catapults and experimenting with them! They also enjoyed watching the launching and measurements! It was a really fun afternoon!


I hope you enjoyed this! If you have any suggestions to make it a better activity, I would love to hear them!
Heidi