Math on My Mind - Week #20
Have you heard the news? We've Moved to HeidiSongs.tv!
Our new website features an online video streaming service, updated blog posts at Heidisongs.blog, and a wealth of fresh resources designed to make learning even more fun and engaging.
You can also continue shopping for our educational products there and at our Teachers Pay Teachers store!
Head over to HeidiSongs.tv now and explore all the exciting new features.
See you there!
__________________________________________________________________________
I seem to have math on my mind this week, so a lot of this week’s blog is dedicated to that topic! I have finally figured out some creative ways for the children to practice this skill in small groups, and I do think that they are really getting the hang of it! Also, I have not been listing the numbered weeks of the Kindergarten Pacing Guide I shared at the start of the year, due to holiday delays and such, but my class is tracking at week 20 if you are following along.
1. Bean Toss Addition and Number Combinations

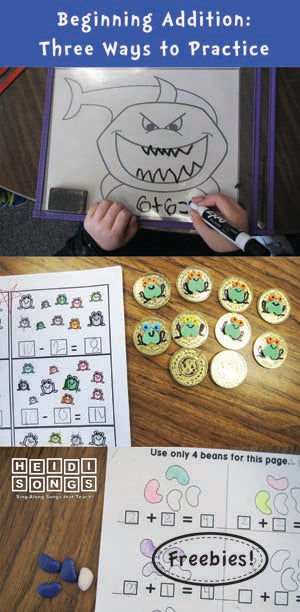
Bean Toss Addition is an old favorite addition activity of mine that I use faithfully each year. It can be used to help children remember the number combinations for any given number, such as four is the same as three plus one or two plus two, etc. To do this, all you need are some lima beans and some spray paint. You paint one side red (or any color, and leave the other side white, and let dry.
To begin, you give each child a cup and just four beans. Then after that, each child spills out his or her beans and colors in the amount of colored beans that came up. The rest are left white. Then the child writes the appropriate matching equation under their colored beans on their worksheet. For example, if the child spills out two colored beans and two white beans, then he colors two beans, and leaves two beans white on his paper. Then he would write the equation, “2 + 2 = 4.” The worksheets get progressively harder, since the beans increase in number.
I know that bean toss addition worksheets are available to download free on the internet. I found my first ones by doing a search, and I regret that I do not know where I found them. But I’ve never seen them with a space for an equation on them, so that’s why I started making my own. I’m attaching these two worksheets as FREE samples! Other than that, I just downloaded mine from the internet and printed out blank equations and cut them out with scissors. I glued the equations down, and that’s how I got the copies that I use in the classroom.
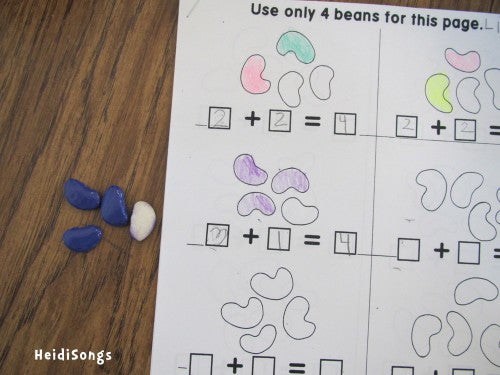
Update: I finished the Bean Toss Addition Worksheets! You can get them here. The file includes masters for both addition AND subtraction, and it’s a $4 download.

This year, I decided to spray paint new beans with lots of different colors and let the children choose what colors they wanted to work with. That way, it wouldn’t always have to be just red, and maybe the children wouldn’t complain about this being “boring” as much. So I bought ten different colors of spray paint at Michael’s, took them outside after school one day and laid the beans out on a layer or two of old newspaper. Once I started spraying, one of the K teachers on my team came out to see what I was doing, and we noticed how beautiful the beans were while they were still wet. Then she suggested that I spray the dry ones with a clear gloss spray paint to make them shine- and she even had some in her classroom! What a GREAT idea! The beans turned out so shiny that they look good enough to eat. (This turned out to be a slight problem for a special needs child in another K classroom because she wanted to eat them, so be aware of this issue.) I let my kids choose a variety of colors for their equations if they wanted, or they could stick to just one color if they preferred that instead. They seem to really like this better than just one color. Plus, we have now dubbed it “Jelly Bean Addition” rather than just “Bean Toss Addition.” Well that sounds a bit more fun now, doesn’t it?
**2020 Idea Update! Looking for a twist? How about, for St. Patrick's, tossing Golden Beans out of a leprechaun pot?
2. Coin Toss Addition or Subtraction


Last year, my kids got VERY tired of tossing beans, so I started looking for a way to throw some more fun into this same basic activity. So I came up with the idea of making it a coin toss addition or subtraction game rather than a bean toss activity. I wanted it to have a nice spring theme, so I decided that I would find some spring or insect themed stickers and put them on those shiny gold toy coins that are sold as party favors. I made up some worksheets to go with them, and voilá! I had a new activity! The only problem was that it took a while to find the right kinds of stickers and so forth that would stay on those gold coins. I figured out that those foam stickers that they sell at craft stores like Michaels will stay on well, unless you actively try to peel them off. So I went looking and found some heart shaped stickers and some oval shaped Easter Egg stickers. After a bit of experimenting, I figured out a way to turn these shapes into bees, bunnies, butterflies, chicks, flowers, frogs, and ladybugs! I really had a blast making them over Spring Break last year with my daughters! I got most of them done myself, and then had volunteers at school finish up what was left.

So basically, the coins have a spring themed object on one side, and nothing on the back. The children put them into a brightly colored spring party cup and then proceed to complete the worksheets the same as they do with the Bean Toss Addition. I give them the whole packet stapled together and they each can work at their own pace. I do not ask them to do it every day, but we usually do it about every other day for a while. If it is a subtraction activity, then the children color the objects that came up colored, and cross out the objects that came up blank on the coins. Then they write a subtraction problem rather than an addition problem. For example, if the child tosses three coins with the bee side up and three coins with the bee side down, then he would color in three bees, and cross out three. Then he would need to count all of the bees and write that number first, which would be six. Then he writes the number of bees that are crossed out, which is three, and then the number of bees that are left, which is three: 6 – 3 = 3.
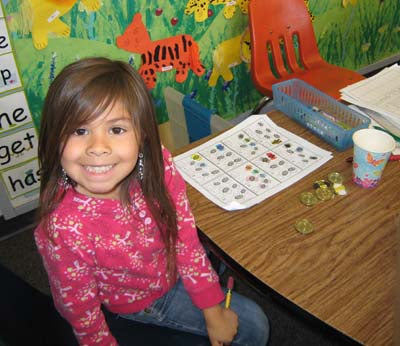
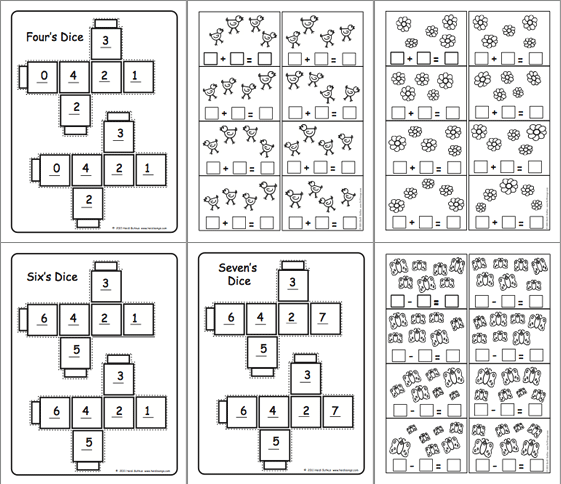
Since I made this game up last year, it is all now completed and posted for sale on my website! It includes both addition and subtraction worksheets that have number combinations from four to ten, then just add the coins. I also included some patterns for dice that you can print and fold up for the kids if you would rather not make the coins. So, if the child rolls a three, then he crosses out three bees. He colors the rest of them. Then he writes 6 – 3 = 3. There is a die pattern included for each of the number combinations, so that you have a die that doesn’t include a number larger than four, and one that does not go larger than five, and one that doesn’t include numbers larger than six, etc. I think you could also just use the beans for this activity, too. But the coins are definitely more fun! This game is a $5.00 download, and it includes both addition and subtraction worksheets.
3. Hundred’s Day Ideas

Our 100th day doesn’t come until Feb. 4th this year, so I wasn’t really thinking about it yet. But someone asked the question on Facebook, so I started posting some ideas and pictures. Then lots of folks started contributing their ideas as well! Below are the ideas that I usually use. Very often, we’ll spend several days working on this sort of thing, because there are just too many good activities out there to confine them to just one day!
Counting to 100 Song:
If there were ever a day to pull this song out and do it again, this is definitely it! It’s a favorite, and totally exhausting if you do it right! We like to vary the movements and change it around as much as possible for variety. It is on both the Jumpin’ Numbers and Shakin’ Shapes CD/DVD and the Musical Math CD and DVD.
Hundreds Day Hat:

I have a master that I inherited from my mother, who is a retired teacher and bequethed me all of her files when she left her job for the greener pastures of a perpetual vacation.
 The kids decorate it, and I usually let them put glitter on the numbers, if I have enough parent help that day. I cleaned it up and included it here for you as a free download! To make the hat, Duplicate on yellow construction paper. (The bottom edge of the paper forms the bottom edge of the crown.) Cut an extra 2” x 12” strip of paper to fit around the back of the head. I usually just cut the top part of the crown off for this. Children may decorate it as they wish, but glitter is always a special treat!
Hundreds Day Trail Mix:
For this, I ask parents to send in boxes of ten different types of snacks and the kids put ten of each item into a baggie. That gives them 100 things to eat! They do that at our math table.
Hundreds Day Writing:
At my language arts table, we write, “I can eat 100 _____.” I have them write a couple of different sentences, (depending on their ability levels) and illustrate them. I read these to the whole class.
Hundreds Day Collections:
Of course, the kids also bring in their 100’s day collections and share them. Don’t we all?????
One Hundred Stamps on a Paper:
I also like to have them put 100 stamps on a paper. To do this I have volunteers divide up a piece of construction paper into ten sections. I have lots of very small stamps. The kids take these and put ten of each stamp into each section. Then they write “10, 20, 30, 40…” etc. in each section til they get to 100.
Hundred Year Old Person:
Each child creates a self portrait of what he or she would look like when they are one hundred years old. Then I have a parent volunteer take dictation and ask the children what they will do for fun when they are 100, where they will live, if they will have pets, etc. The volunteer types up their sentences and we glue them underneath their pictures. Sometimes their views of what life will be like when they are old are pretty entertaining!
4. My kids LOVE the “His” Song!
Here is a video clip of the “His” song from Sight Words 4. The kids love it (especially the boys) because it has a car theme and sound effects. Isn’t it kind of funny how universal it is that boys like cars? I understand that even male primates show a strong preference for wheeled toys over any other! Anyway, here are the lyrics:
His, his, H-I-S!
“His” is for a boy!
His, his, H-I-S!
That car is his toy!
Vrooom! Beep, beep!
In the motions, the children drive a car around in circles, rev the engine on the “vroom” sound, and then honk the horn on the “beep, beep!” sound. At the end of the song, they hear the car crash and they all fall down as the sirens begin to sound. This song is our current class favorite, and is constantly requested. I would say that the video here doesn’t really even do them justice, since the boys got a little shy when the camera went on this time- and they are really supposed to be the “stars” of this particular show! They are really much more “into it” in person.
I am including for you here as a free download the worksheets for the word “His” that come in the Resource Workbook, and the Mini Sing Along Songbook that goes along with them! Perhaps if you have a projector and an internet connection in your class, you can show your students the movie and teach them the song in your classroom, even if you don’t own the CD or DVD. And now you will have the follow up activities, too! I never do all of the worksheets; I just choose the ones that I think best suit the level and needs of my students. I also usually only give the worksheets for homework, but we do the the Mini Sing Along Songbooks in class whenever we can find the time.
5. Shark Teeth Addition

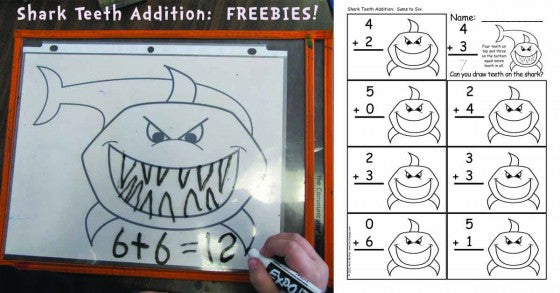
When I was thinking about creating another addition worksheet like the one with the stars that I gave you last week, I got this idea about having the children draw teeth on a shark. So I set about drawing a shark with a “head-on” view so that the mouth would be front, center, and open. Once I had that done, my husband helped me scale the tail of the shark back in order to make room for real pattern blocks to fit in the mouth for teeth. The result was a great looking shark workmat that the children really loved! This is what we did:
I gave each child in the group a shark workmat (Free Sample!) and ten of the green triangle pattern blocks. We chose a child to spin the spinner, and then everybody put that many triangle teeth on the top of the shark’s mouth. (Notice the shark is toothless!) Then another child got to spin the spinner, and everybody put that many triangle “teeth” on the bottom part of the shark’s mouth. The children then added up the total number of shark teeth and wrote the equation on a white board.
Some of the children caught on to this right away and were quickly ready to transfer this to the symbolic level and do it on paper, but some children were definitely not! So the next day, some of the groups repeated the shark teeth activity with the triangle pattern blocks, and some of the groups learned how to draw the teeth on the shark themselves and solve the equations that were printed on the worksheet. (Click here for a FREE sample of my Shark Teeth Addition worksheets!) For the groups that went on to the worksheet, this is what they did: each child got a copy of the worksheet with the workmat printed on the back. I asked someone to spin the spinner again, but this time they drew the teeth on the big shark on the workmat rather than placed blocks down on it. Then they wrote the equation in the corner of their paper.

After that, they flipped over their papers and did the worksheet on the other side. If the equation said “5 + 3,” then the child drew five teeth on top and three teeth on the bottom of the shark’s mouth, and then counted them up. Then they wrote the answer in the appropriate space. We are definitely getting a lot of “mileage” out of this shark addition activity! I’m hoping to make more with other sea animals, since we are now in the middle of our unit on ocean animals. The ones that are finished with it are just going back to the Bean Toss Addition page, so it is all working out.
Update:
This activity was so popular that I wound up making a full set of worksheets and posting them on my website! You can get them here.
 It’s a $3.00 download for the set. You can also get them on TpT for $4.00 right here.
And if you are looking for Shark Teeth Subtraction, you can get it on HeidiSongs.com here for $3.00.
You can get Shark Teeth Subtraction on TpT here for $4.00.
Hope you enjoy it!
P.S. Don't forget all our videos are available to STREAM on UScreen, FREE for the first 30 days! It's an awesome way to bring some EASY, active learning to your students during this time, and they can always cancel right before they are ever charged, like on day 29! Check out the info page on our website for more info!
----------------------------------
Follow me! Did you enjoy this post? Do me a favor and share it with your friends! And follow this blog by signing up for my email updates here, and follow me on TPT! I'm also on Pinterest, Facebook, Twitter, Instagram, and YouTube, too! Don't forget to sign up for our email newsletter for special deals and promo codes that you won't find out about anywhere else.


