How to Keep Kids On the App of Your Choice
Have you heard the news? We've Moved to HeidiSongs.tv!
Our new website features an online video streaming service, updated blog posts at Heidisongs.blog, and a wealth of fresh resources designed to make learning even more fun and engaging.
You can also continue shopping for our educational products there and at our Teachers Pay Teachers store!
Head over to HeidiSongs.tv now and explore all the exciting new features.
See you there!
__________________________________________________________________________
I love using iPads and iPods in my classroom, but keeping kids on the app that I have designated for the day has been almost impossible without an adult to keep an eye on them- until I learned about a wonderful feature called GUIDED ACCESS. A participant at the Catholic Ministries Conference in Dallas told me about Guided Access in October, and since then I was eager to try it out so that I could tell you all about it. She said that all I had to do to use Guided Access on my iPad or iPod Touch was to make sure I had fully updated the operating system to version iOS 6.0 or later. All I had to do was download it and that it would probably take about an hour.
My heart sank, because the way she described it sounded terribly confusing to me and “techy.” If it was that hard, how would I manage it with six iPads in the room? And furthermore, how in the world would I be able to explain it to all of you? As far as I was concerned, it was a deal breaker, and in my mind, I just let it go. But each time I walked past my iPad center, I saw that MOST of the children were simply playing with any old app, and very few of them were following my directions and staying on the app that I had designated, unless it was particularly enticing and looked like fun. So I finally decided to investigate Guided Access a bit further over the weekend. It turned out to be incredibly EASY! In fact, my iPad was ALREADY updated to iOS 6, so I didn’t have to do a thing other than change the settings. And your iPad is probably already updated, too. So check it out!
This is all you have to do to find out if your iPad is already running iOS 6.
1. Go to the Settings Menu of your iPad. That’s the one with the silver gear icon. (Make sure you are using an iPad 2 or 3; this won’t work on an iPad 1.)
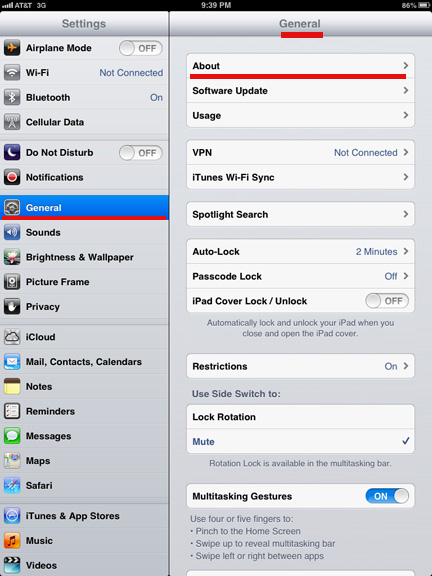
Go to the Settings menu, click on “General,” and then click “About.”
2. Select “About,” and then look under the heading of “Version.” If it says “6.0” or later, such as “6.0.1” then you will already be able to use Guided Access. If not, then plug your iPad or iPod into your computer and open up iTunes. If your computer asks if you want to update your software on your iPad or iPod, just say YES and let it do it’s job. When it is done, double check that you now have version 6.0 or 6.0.1 (etc.) installed on your unit.
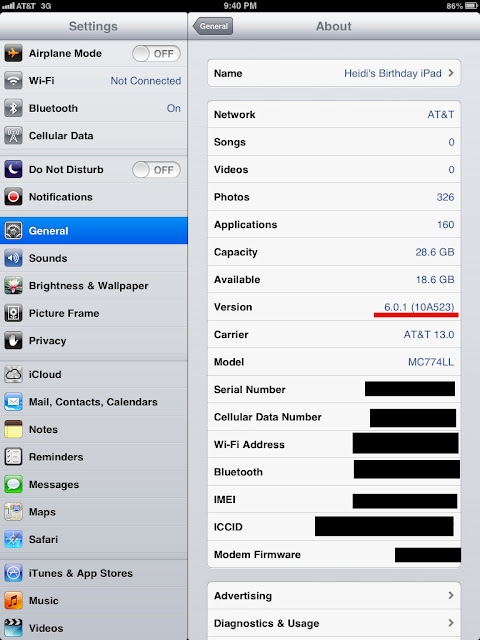
After you click on “About,” then look under “Version.” If it says “6.0” or “6.0.1” or even later, you are all set! If not, then plug your device into a computer with iTunes and allow it to update your software to the most current version available.
This is how to change your settings so that Guided Access is enabled.
1. In the Settings menu, select “General” at the top of the screen to back to the main Settings Menu.
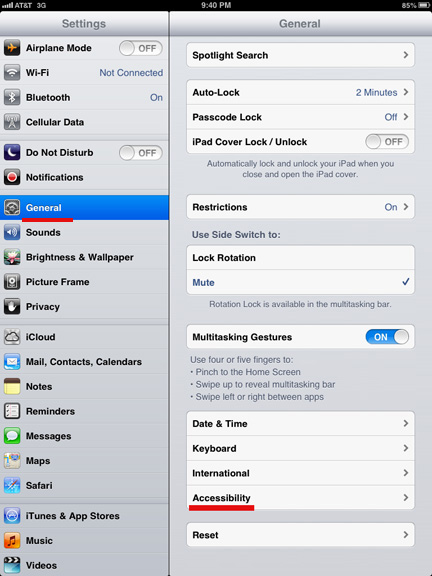
Still in the Settings menu, select “General” at the top of the screen to back to the main settings menu. Then you’ll have to scroll all the way down to find the word “Accessibility” that you see underlined in red in the picture above. (You won’t see it until you scroll down using the scroll bar.)
2. Scroll down, and then select “Accessibility.”
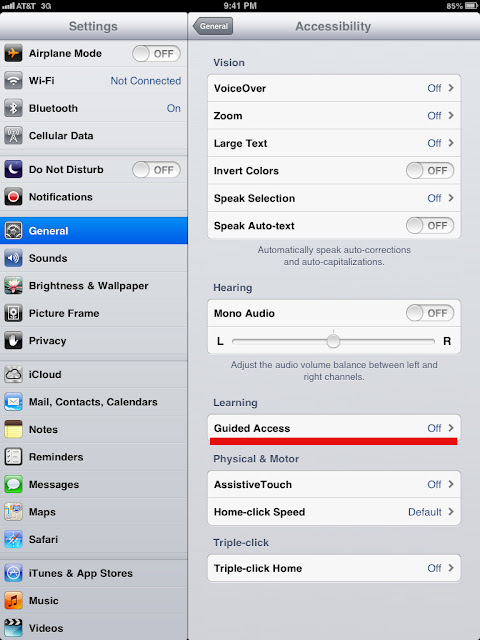
In that Accessibility menu, near the bottom of the screen, select “Guided Access.” The default position is “off.”
3. In that Accessibility menu, near the bottom of the screen, select “Guided Access.” You will see that the default position for Guided Access is “off.”
4. Select the word “on” to turn Guided Access on, (or off to turn it off, of course.)
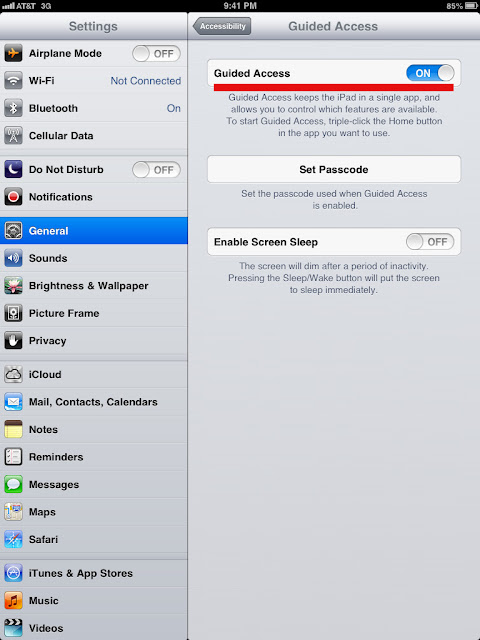
Switch Guided Access to “on.”
5. Press the button that says “Set Passcode” to set the code that you will need to get out of Guided Access.
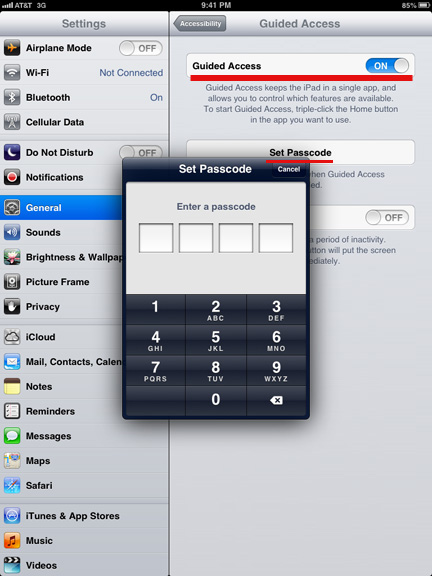
6. Press the home button (the large button at the bottom of your iPad or iPod) to get back out of the Settings Menu.
Now that you have it enabled, here’s how to use it.
1. Open any app that you want your kids to use.
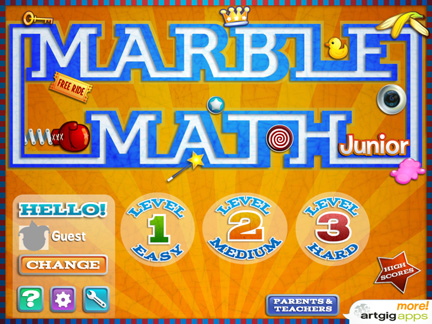
Here is an app that I just discovered that my kids love!
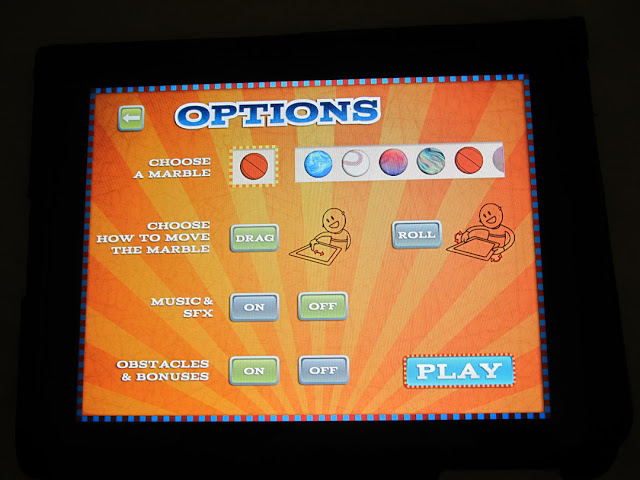
Here is the options menu of the Marble Math Game.
2. Triple click the home button (Push the large button at the bottom three times in succession very fast.)

Here is the options menu of the Marble Math Game without the Guided Access start up screen.
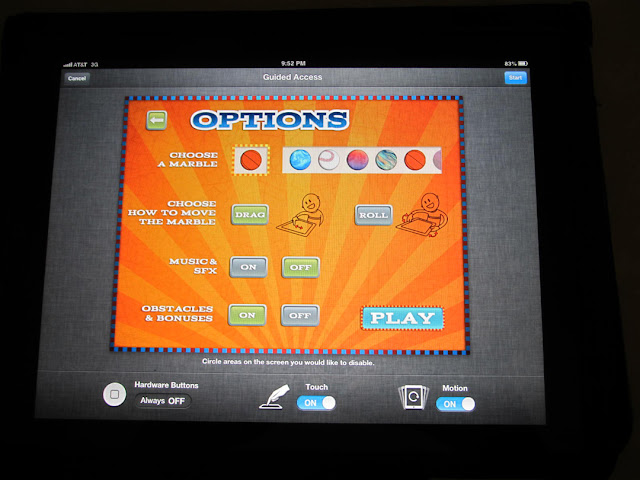
Here is the options menu of the Marble Math app after you triple-click the home button to start up Guided Access. It shrinks down to show the options for Guided Access along the edges. Click the “start” button at the top right corner to begin Guided Access. (You do NOT need to be in the options menu of any app to start up Guided Access! I just happened to have been on that screen when I took the screen shot.)
3. The app on the screen will shrink down a little bit, leaving a frame around the edges as you see in the picture below. You will see some Guided Access options around the outside edges. You can change the options if you like, but I have never found any reason to do so.
4. From that point, you can either click “start” in the upper right hand corner. The Guided Access frame will disappear and the app will return to its normal size and appearance. The game will run the same as before, except that any exit buttons will not work. The home button will also be disabled so that children cannot push it and therefore exit the game.
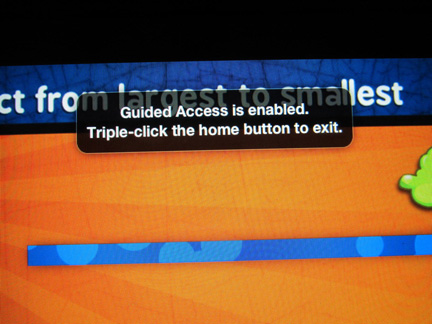
5. So then all you have to do is let your students play the game! If they try to click the home button to get out of the app, or exit the app in any way, they will get a message on the screen that looks like this picture below, saying, “Guided access is enabled. Triple-click the home button to exit.”
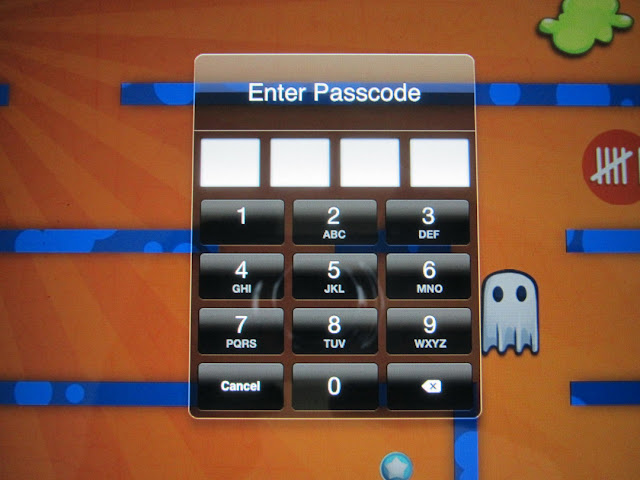
6. Even if, by some miracle, your young students CAN read this message and figure out how to triple-click the home button, they would still need to enter your passcode to exit the app. They would see the message in this picture below:
7. Assuming that they do not know your passcode, then the message will time out and the game will start itself up again, just like magic!
8. When you are ready to let your students play a different game, just triple-click the home button and then enter your passcode. You will see this screen below:
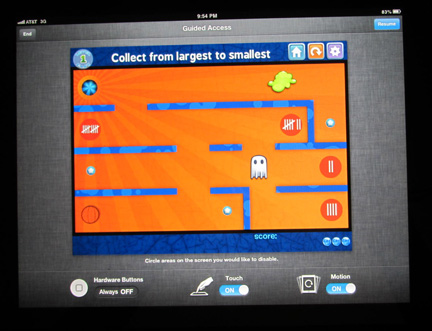
9. Just click “end” on the upper left hand corner to end the game, and enter your passcode. Guided Access will be ended and you will be able to use your iPad as normally with full access to your iPad or iPod as before.
There are many youtube videos available that can show you exactly how to do this. I did a quick search on YouTube and found quite a few just by searching YouTube under the words “Guided Access on the iPad.”
So far, I have been using Guided Access in my classroom for about two weeks. I have found it to be an incredibly useful tool, and I think that it will definitely raise the achievement level in my classroom because now I can ensure that my students are spending their time on the iPads doing the educational apps that I have selected for that day, rather than the ones that they enjoy the most.
I hope that you have enjoyed this post! Here are some other posts that are related to using technology in the classroom. If you find this blog useful, sign up for the emailed updates so that you don’t miss any, and tell a friend! And come back next week for a couple of really fun Pete the Cat Saves Christmas Freebies! And don’t forget to visit HeidiSongs for the best in multi-sensory educational resources for children.
And if you are looking for the handouts from the sessions from SDE’s conference in Orlando this weekend, I will get them posted here next week as well.
Tips for the One iPad Classroom, and a Free Rules for the iPad Poster Download!
Best Free and Paid Apps for Kindergarten and Pre-K
----------------------------------
Follow me! Did you enjoy this post? Do me a favor and share it with your friends! And follow this blog by signing up for my email updates here, or follow on Bloglovin', or follow me on TPT! I'm also on Pinterest, Facebook, Twitter, Instagram, Google+ and YouTube, too! Don't forget to sign up for our email newsletter for special deals and promo codes that you won't find out about anywhere else.

My heart sank, because the way she described it sounded terribly confusing to me and “techy.” If it was that hard, how would I manage it with six iPads in the room? And furthermore, how in the world would I be able to explain it to all of you? As far as I was concerned, it was a deal breaker, and in my mind, I just let it go. But each time I walked past my iPad center, I saw that MOST of the children were simply playing with any old app, and very few of them were following my directions and staying on the app that I had designated, unless it was particularly enticing and looked like fun. So I finally decided to investigate Guided Access a bit further over the weekend. It turned out to be incredibly EASY! In fact, my iPad was ALREADY updated to iOS 6, so I didn’t have to do a thing other than change the settings. And your iPad is probably already updated, too. So check it out!
This is all you have to do to find out if your iPad is already running iOS 6.
1. Go to the Settings Menu of your iPad. That’s the one with the silver gear icon. (Make sure you are using an iPad 2 or 3; this won’t work on an iPad 1.)

2. Select “About,” and then look under the heading of “Version.” If it says “6.0” or later, such as “6.0.1” then you will already be able to use Guided Access. If not, then plug your iPad or iPod into your computer and open up iTunes. If your computer asks if you want to update your software on your iPad or iPod, just say YES and let it do it’s job. When it is done, double check that you now have version 6.0 or 6.0.1 (etc.) installed on your unit.

This is how to change your settings so that Guided Access is enabled.
1. In the Settings menu, select “General” at the top of the screen to back to the main Settings Menu.

2. Scroll down, and then select “Accessibility.”

3. In that Accessibility menu, near the bottom of the screen, select “Guided Access.” You will see that the default position for Guided Access is “off.”
4. Select the word “on” to turn Guided Access on, (or off to turn it off, of course.)

5. Press the button that says “Set Passcode” to set the code that you will need to get out of Guided Access.

6. Press the home button (the large button at the bottom of your iPad or iPod) to get back out of the Settings Menu.
Now that you have it enabled, here’s how to use it.
1. Open any app that you want your kids to use.


2. Triple click the home button (Push the large button at the bottom three times in succession very fast.)


3. The app on the screen will shrink down a little bit, leaving a frame around the edges as you see in the picture below. You will see some Guided Access options around the outside edges. You can change the options if you like, but I have never found any reason to do so.
4. From that point, you can either click “start” in the upper right hand corner. The Guided Access frame will disappear and the app will return to its normal size and appearance. The game will run the same as before, except that any exit buttons will not work. The home button will also be disabled so that children cannot push it and therefore exit the game.
5. So then all you have to do is let your students play the game! If they try to click the home button to get out of the app, or exit the app in any way, they will get a message on the screen that looks like this picture below, saying, “Guided access is enabled. Triple-click the home button to exit.”

6. Even if, by some miracle, your young students CAN read this message and figure out how to triple-click the home button, they would still need to enter your passcode to exit the app. They would see the message in this picture below:

7. Assuming that they do not know your passcode, then the message will time out and the game will start itself up again, just like magic!
8. When you are ready to let your students play a different game, just triple-click the home button and then enter your passcode. You will see this screen below:

9. Just click “end” on the upper left hand corner to end the game, and enter your passcode. Guided Access will be ended and you will be able to use your iPad as normally with full access to your iPad or iPod as before.
There are many youtube videos available that can show you exactly how to do this. I did a quick search on YouTube and found quite a few just by searching YouTube under the words “Guided Access on the iPad.”
So far, I have been using Guided Access in my classroom for about two weeks. I have found it to be an incredibly useful tool, and I think that it will definitely raise the achievement level in my classroom because now I can ensure that my students are spending their time on the iPads doing the educational apps that I have selected for that day, rather than the ones that they enjoy the most.
I hope that you have enjoyed this post! Here are some other posts that are related to using technology in the classroom. If you find this blog useful, sign up for the emailed updates so that you don’t miss any, and tell a friend! And come back next week for a couple of really fun Pete the Cat Saves Christmas Freebies! And don’t forget to visit HeidiSongs for the best in multi-sensory educational resources for children.
And if you are looking for the handouts from the sessions from SDE’s conference in Orlando this weekend, I will get them posted here next week as well.
Tips for the One iPad Classroom, and a Free Rules for the iPad Poster Download!
Best Free and Paid Apps for Kindergarten and Pre-K
----------------------------------
Follow me! Did you enjoy this post? Do me a favor and share it with your friends! And follow this blog by signing up for my email updates here, or follow on Bloglovin', or follow me on TPT! I'm also on Pinterest, Facebook, Twitter, Instagram, Google+ and YouTube, too! Don't forget to sign up for our email newsletter for special deals and promo codes that you won't find out about anywhere else.


