More Projects for the Beginning of the School Year, and Declaring War on Glue Bottles!
Have you heard the news? We've Moved to HeidiSongs.tv!
Our new website features an online video streaming service, updated blog posts at Heidisongs.blog, and a wealth of fresh resources designed to make learning even more fun and engaging.
You can also continue shopping for our educational products there and at our Teachers Pay Teachers store!
Head over to HeidiSongs.tv now and explore all the exciting new features.
See you there!
__________________________________________________________________________
It has been an eventful week! Here are some more beginning of the year projects that I have been prepping. They are very simple and easy to make. But I am going to start with some tips on getting your glue bottles ready to go!

1. Declaring WAR on Glue!
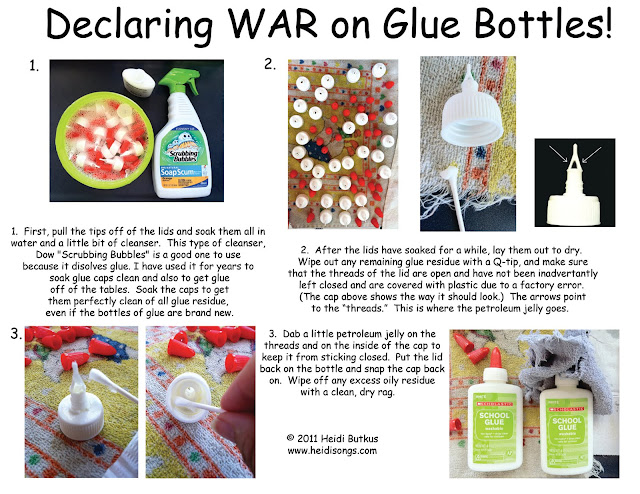
Few things are more frustrating than having a great project ready to go, and then having it derailed by a bunch continuously clogged glue bottles. One of the readers on my HeidiSongs Facebook page commented, “Glue is the arch-nemesis of Kindergarten!” So I decided to do some research on how to make those glue bottles keep from clogging up. I found that if you remove the small caps on the very top, and spray them with Pam cooking spray, the glue does not stick to them. I also learned that if you coat the “threads” of the lid with petroleum jelly before replacing the small cap, the glue will not stick to those, either. BUT- it makes sense to me that the glue lids must be completely clean first in order for this to work, so I decided to soak them in cleanser before beginning. I used a mixture of water and a little bit of the liquid “Scrubbing Bubbles” cleanser. For the rest of the procedure, see the picture. If you would like to download it so that you can print it out, read it, and save the directions, click here.
As a side note, this "Scrubbing Bubbles" brand cleanser works great to dissolve glue off of tables. Just spray it on and let it set for three to five minutes. Sometimes, I spray a little water on the table as well. Then I use a scraper that I bought at Home Depot, and all of the glue just slides right off as easy as pie.
As I was trying to figure out how to do this and discussing it on my Facebook page, there was a little bit of teasing going on, with people saying they were worried about me and my obsession with glue as I posted my pictures, etc. It was pretty funny. My posts kept finishing with the phrase, "Stay tuned..." because I was still trying to figure out how it would go. But the conversation culminated in this quote from Erin Lyons, which I thought was absolutely HILARIOUS: "I have an imaginary video running in my head. Close your eyes and join me: It's the first project in Heidi's class. "The children are about to squeeze "just a dot (not a lot!)." Suddenly, chaos breaks out when projectiles shoot across the room from the highly-lubed glue caps, and children become part of an unintentional, but hugely creative mass-media sculpture formed of tissue paper, hair, furniture, carpeting, pom-poms, clothing, and pipe cleaners. I AM staying tuned... glued to my seat!" When I read that one, I nearly fell out of my chair laughing! Good one, Erin!!! That's MY kind of sense of humor!!!
Also, the conversation also inspired another reader, Krissy Miner, to create another free download which she posted on Teachers Pay Teachers! It is called "Top Secret Gluing Techniques for Beginning Gluers." I think what she has here is a great idea, because she's got the children practicing making small glue dots and glue frames ONLY- they are not actually gluing things down at all! They are just practicing squeezing out the small amounts of glue. This makes sense because what we should do when teaching is do a task analysis: That is, break down a task into the smallest possible steps, and teach each one. When you skip a step, or assume that they know it, that is where the problems arise. But I never thought about thinking of the gluing part as a separate skill. Bravo, Krissy!!!!
There are also lots of little rhymes out there, I've discovered that while helping children remember how much glue to use. I came up with one myself! You can find it on my Classroom Management CD and DVD! Check it out here!
Heidi's Glue Song
(© Heidi Butkus 2011)
2. Traffic Light

The traffic light is part of our unit on safety. When we make it, we also read books about signs around town and safety when on the way to and from school, etc. It is very simple to prepare and does not require any patterns. Each child needs the following construction paper cut:
1 black rectangle 6” x 9”
1 yellow square 3” x 3”
1 red square 3” x 3”
1 green square 3” x 3”
To make the traffic light, show the children how to round the corners off of the colored squares to form circles. I always have them sing me the color songs from Sing and Spell Vol. 2 while we cut. Then point out to them that they do not need to cut the black rectangle at all, but they will need to think about where to glue each colored circle. Red goes on top; green is on the bottom, and yellow is in the middle. To help them remember, consider singing this simple song, sung to the tune of “Twinkle, Twinkle, Little Star:” You may even wish to print out the words to the song and have them glue these lyrics onto the back of the light.
The traffic lights we see ahead are sometimes green and sometimes red!
Red on top and green below!
Red means stop and green means go!
Yellow means wait- even if you’re late!
The traffic lights we see ahead are sometimes green and sometimes red!
3. Stop Sign

The stop sign is another project that I always do with our unit on safety. All you do with this one is copy the sign on red construction paper and then have the children try to color in the letters of the sign with a white crayon and cut the whole thing out. Then they glue it on to a tongue depressor and have fun holding it up and saying, “STOP!!!!!” to each other for the rest of the day! The Octagon Song is also a natural for this project, as well! It's from Jumpin' Numbers and Shakin' Shapes. For the master, click here.
4. September Calendar

All of the Kindergarten classes at my school have the children make a calendar at the beginning of each month, and this is the calendar that we will be making for September. To make it, the children take some large shape stencils that we have had “forever” (sorry, I don’t know where they came from!) and they use these to draw whatever shapes they like with crayons. We usually sing the shape songs from Jumpin' Numbers and Shakin' Shapes while I demonstrate the tracing of them. The large colored shapes are pre-cut for the children out of different colored pieces of tissue paper, and they can glue them down wherever they like. Sometimes, we also give them a small amount of water to paint over the top to make the colors bleed. Later, you can remove the tissue paper when it tries to see what the remaining paper looks like without it- but I really like the way it turns out best when you leave the tissue paper on, so we don’t do that anymore.
----------------------------------
Follow me! Did you enjoy this post? Do me a favor and share it with your friends! And follow this blog by signing up for my email updates here, or follow on Bloglovin', or follow me on TPT! I'm also on Pinterest, Facebook, Twitter, Instagram, Google+ and YouTube, too! Don't forget to sign up for our email newsletter for special deals and promo codes that you won't find out about anywhere else.

1. Declaring WAR on Glue!
Few things are more frustrating than having a great project ready to go, and then having it derailed by a bunch continuously clogged glue bottles. One of the readers on my HeidiSongs Facebook page commented, “Glue is the arch-nemesis of Kindergarten!” So I decided to do some research on how to make those glue bottles keep from clogging up. I found that if you remove the small caps on the very top, and spray them with Pam cooking spray, the glue does not stick to them. I also learned that if you coat the “threads” of the lid with petroleum jelly before replacing the small cap, the glue will not stick to those, either. BUT- it makes sense to me that the glue lids must be completely clean first in order for this to work, so I decided to soak them in cleanser before beginning. I used a mixture of water and a little bit of the liquid “Scrubbing Bubbles” cleanser. For the rest of the procedure, see the picture. If you would like to download it so that you can print it out, read it, and save the directions, click here.
As a side note, this "Scrubbing Bubbles" brand cleanser works great to dissolve glue off of tables. Just spray it on and let it set for three to five minutes. Sometimes, I spray a little water on the table as well. Then I use a scraper that I bought at Home Depot, and all of the glue just slides right off as easy as pie.
As I was trying to figure out how to do this and discussing it on my Facebook page, there was a little bit of teasing going on, with people saying they were worried about me and my obsession with glue as I posted my pictures, etc. It was pretty funny. My posts kept finishing with the phrase, "Stay tuned..." because I was still trying to figure out how it would go. But the conversation culminated in this quote from Erin Lyons, which I thought was absolutely HILARIOUS: "I have an imaginary video running in my head. Close your eyes and join me: It's the first project in Heidi's class. "The children are about to squeeze "just a dot (not a lot!)." Suddenly, chaos breaks out when projectiles shoot across the room from the highly-lubed glue caps, and children become part of an unintentional, but hugely creative mass-media sculpture formed of tissue paper, hair, furniture, carpeting, pom-poms, clothing, and pipe cleaners. I AM staying tuned... glued to my seat!" When I read that one, I nearly fell out of my chair laughing! Good one, Erin!!! That's MY kind of sense of humor!!!
Also, the conversation also inspired another reader, Krissy Miner, to create another free download which she posted on Teachers Pay Teachers! It is called "Top Secret Gluing Techniques for Beginning Gluers." I think what she has here is a great idea, because she's got the children practicing making small glue dots and glue frames ONLY- they are not actually gluing things down at all! They are just practicing squeezing out the small amounts of glue. This makes sense because what we should do when teaching is do a task analysis: That is, break down a task into the smallest possible steps, and teach each one. When you skip a step, or assume that they know it, that is where the problems arise. But I never thought about thinking of the gluing part as a separate skill. Bravo, Krissy!!!!
There are also lots of little rhymes out there, I've discovered that while helping children remember how much glue to use. I came up with one myself! You can find it on my Classroom Management CD and DVD! Check it out here!
Heidi's Glue Song
(© Heidi Butkus 2011)
Just a dot, not a lot! One dot!
Just a dot, not a lot! One dot!
Just a dot, not a lot! One dot!
Just a dot, not a lot! One dot!
Just a dot, not a lot! One dot!
Just a dot, not a lot! One dot!
Just a dot, not a lot! One dot!
2. Traffic Light

The traffic light is part of our unit on safety. When we make it, we also read books about signs around town and safety when on the way to and from school, etc. It is very simple to prepare and does not require any patterns. Each child needs the following construction paper cut:
1 black rectangle 6” x 9”
1 yellow square 3” x 3”
1 red square 3” x 3”
1 green square 3” x 3”
To make the traffic light, show the children how to round the corners off of the colored squares to form circles. I always have them sing me the color songs from Sing and Spell Vol. 2 while we cut. Then point out to them that they do not need to cut the black rectangle at all, but they will need to think about where to glue each colored circle. Red goes on top; green is on the bottom, and yellow is in the middle. To help them remember, consider singing this simple song, sung to the tune of “Twinkle, Twinkle, Little Star:” You may even wish to print out the words to the song and have them glue these lyrics onto the back of the light.
The traffic lights we see ahead are sometimes green and sometimes red!
Red on top and green below!
Red means stop and green means go!
Yellow means wait- even if you’re late!
The traffic lights we see ahead are sometimes green and sometimes red!
3. Stop Sign

The stop sign is another project that I always do with our unit on safety. All you do with this one is copy the sign on red construction paper and then have the children try to color in the letters of the sign with a white crayon and cut the whole thing out. Then they glue it on to a tongue depressor and have fun holding it up and saying, “STOP!!!!!” to each other for the rest of the day! The Octagon Song is also a natural for this project, as well! It's from Jumpin' Numbers and Shakin' Shapes. For the master, click here.
4. September Calendar

All of the Kindergarten classes at my school have the children make a calendar at the beginning of each month, and this is the calendar that we will be making for September. To make it, the children take some large shape stencils that we have had “forever” (sorry, I don’t know where they came from!) and they use these to draw whatever shapes they like with crayons. We usually sing the shape songs from Jumpin' Numbers and Shakin' Shapes while I demonstrate the tracing of them. The large colored shapes are pre-cut for the children out of different colored pieces of tissue paper, and they can glue them down wherever they like. Sometimes, we also give them a small amount of water to paint over the top to make the colors bleed. Later, you can remove the tissue paper when it tries to see what the remaining paper looks like without it- but I really like the way it turns out best when you leave the tissue paper on, so we don’t do that anymore.
----------------------------------
Follow me! Did you enjoy this post? Do me a favor and share it with your friends! And follow this blog by signing up for my email updates here, or follow on Bloglovin', or follow me on TPT! I'm also on Pinterest, Facebook, Twitter, Instagram, Google+ and YouTube, too! Don't forget to sign up for our email newsletter for special deals and promo codes that you won't find out about anywhere else.


