Common Core Literacy Centers: Sight Word Wands!
Have you heard the news? We've Moved to HeidiSongs.tv!
Our new website features an online video streaming service, updated blog posts at Heidisongs.blog, and a wealth of fresh resources designed to make learning even more fun and engaging.
You can also continue shopping for our educational products there and at our Teachers Pay Teachers store!
Head over to HeidiSongs.tv now and explore all the exciting new features.
See you there!
__________________________________________________________________________
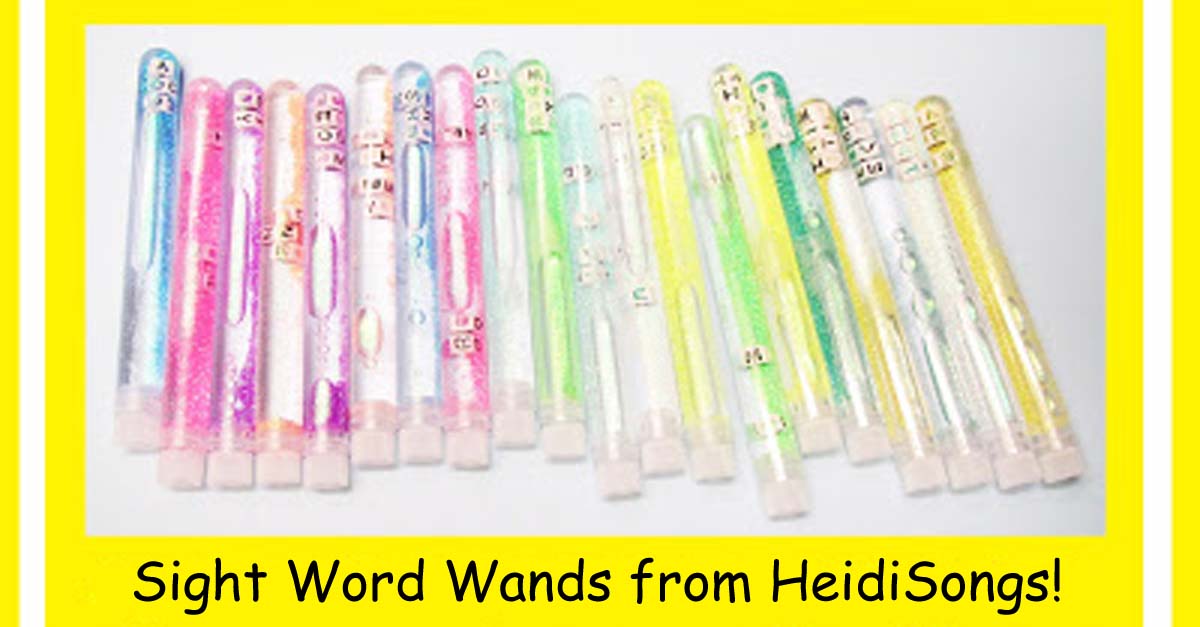
Here’s a great new idea that I developed for my new session on Common Core Literacy Centers, and I have decided to call it Sight Word Wands! I can tell you that they are so bright, colorful, and appealing that I can hardly keep my own hands off of them, LOL! Read this post if you would like to find out how you can make some of these beauties yourself.

If you want to make sure the beads can’t “change places” in the tube, make sure you start with tubes that are 16 x 150 mm. And though it may look like I added food coloring to the water, I did not! This is just the effect of the glitter.

First, I want to give credit where credit is due: I was inspired by this idea that I saw on Pinterest from Mrs. Kelly’s Kindergarten! I only just found her blog via that pin, and I have to say that she has lots of great ideas, so kudos to Kelly! I will be following her blog from now on!

To make sure that the beads don’t “change places” in the tube, make sure that they are 7mm beads.
Anyway, I couldn’t figure out where she found those cute little bottles, and I also wanted to give the idea my own little creative “twist,” so I went looking on Amazon to see what kinds of little bottles I could find. I found that the cheapest thing available was plastic test tubes! So I bought 10 Packs 6-inch, 16 x150 mm Clear Plastic Test Tubes with Caps by Lake Charles Manufacturing for $3.99!
Then I found some alphabet beads at Michael’s. They are Alphabet Beads By Bead Landing (.27 Inch) 7mm in a pack of 500, which was more than enough for the twenty sight words that I needed. I found a similar product on Amazon here. You may want to see if you can find some lower case letter beads for your project, though!

I think that the key is to get the right size of test tubes and right size of alphabet beads so that the beads cannot pass one another inside of the tube. That way, they will always stay in order. I think that this activity is challenging enough with the letters IN order, given that the children will not be able to tell which way is up or down on the beads that they see in the bottles (because they are constantly spinning in the water), so I decided to do it this way and keep the letters in order. The activity could be modified, of course, by using smaller or larger beads or tubes.

Once I found the beads that I wanted and put them into the tubes in the right order, I added some water, being careful to leave some space at the top for the cap. (I was also careful to always start with the first letter of the word on the bottom of the tube, so that the words would all be “read” in the same direction.) Then I added a little bit of the glitter that I bought at Michael’s. I purchased Creatology Glitter Ten Pack of glitter, which does not appear to be sold online, unfortunately, so I cannot give you a link. I did not add any food coloring to the water; it didn’t seem to need it!

Then I put a bit of glue on the lid to discourage the children from trying to open up the wands and creating havoc in my classroom (not that this would ever happen, ha ha!) and put the lid on the tube. I did purchase a special glue that was supposed to be made to seal against moisture, and time will tell if it will really work! It was called Glass, Metal, and More Premium Permanent Glue by Beacon. I have to tell you that I only paid $5.99 for it at Michael’s, and then I had a 40% off coupon! They are charging $11.99 for it on Amazon, and that’s pretty unusual that it is actually MORE expensive on Amazon! I was very surprised to see that.

I decided to make a recording sheet for my kids to write the words that they find in the “wands” on the page, too, and this is a free download for you today! If you decide to “go for it” and make some wands, I hope that you and your kids enjoy it! I was thinking that perhaps this would work nicely with baby food jars, too, and that might save you the expense of buying the test tubes. But then they wouldn’t look like wands, would they?

Let the wands dry overnight with the glued on caps sitting up in the air.
I think that this would be a better activity over all if it were made with lower case alphabet beads, but I didn’t see any when I was shopping, and now it is too late for my project. But I think I will use this as a greater challenge for my students: I will just have them see if they can look at the word written in capitals, but see if they can write it in lower case letters!
If you liked this post, check out these other popular posts, and check out our website! And sign up for our email updates!
Common Core Literacy Centers: Phonics Spoons!
How to Do Guided Reading with Children That Cannot Yet Read
Monster Teeth Subtraction
Teaching Kindergartners to Write Paragraphs!
Teaching CVC Words: What to Do When They Are STILL Not Getting It!
How to Teach Children To Write Words Like They Sound
----------------------------------
Follow me! Did you enjoy this post? Do me a favor and share it with your friends! And follow this blog by signing up for my email updates here, or follow on Bloglovin', or follow me on TPT! I'm also on Pinterest, Facebook, Twitter, Instagram, Google+ and YouTube, too! Don't forget to sign up for our email newsletter for special deals and promo codes that you won't find out about anywhere else.
If you want to make sure the beads can’t “change places” in the tube, make sure you start with tubes that are 16 x 150 mm. And though it may look like I added food coloring to the water, I did not! This is just the effect of the glitter.
First, I want to give credit where credit is due: I was inspired by this idea that I saw on Pinterest from Mrs. Kelly’s Kindergarten! I only just found her blog via that pin, and I have to say that she has lots of great ideas, so kudos to Kelly! I will be following her blog from now on!
Anyway, I couldn’t figure out where she found those cute little bottles, and I also wanted to give the idea my own little creative “twist,” so I went looking on Amazon to see what kinds of little bottles I could find. I found that the cheapest thing available was plastic test tubes! So I bought 10 Packs 6-inch, 16 x150 mm Clear Plastic Test Tubes with Caps by Lake Charles Manufacturing for $3.99!
Then I found some alphabet beads at Michael’s. They are Alphabet Beads By Bead Landing (.27 Inch) 7mm in a pack of 500, which was more than enough for the twenty sight words that I needed. I found a similar product on Amazon here. You may want to see if you can find some lower case letter beads for your project, though!
I think that the key is to get the right size of test tubes and right size of alphabet beads so that the beads cannot pass one another inside of the tube. That way, they will always stay in order. I think that this activity is challenging enough with the letters IN order, given that the children will not be able to tell which way is up or down on the beads that they see in the bottles (because they are constantly spinning in the water), so I decided to do it this way and keep the letters in order. The activity could be modified, of course, by using smaller or larger beads or tubes.
Once I found the beads that I wanted and put them into the tubes in the right order, I added some water, being careful to leave some space at the top for the cap. (I was also careful to always start with the first letter of the word on the bottom of the tube, so that the words would all be “read” in the same direction.) Then I added a little bit of the glitter that I bought at Michael’s. I purchased Creatology Glitter Ten Pack of glitter, which does not appear to be sold online, unfortunately, so I cannot give you a link. I did not add any food coloring to the water; it didn’t seem to need it!
Then I put a bit of glue on the lid to discourage the children from trying to open up the wands and creating havoc in my classroom (not that this would ever happen, ha ha!) and put the lid on the tube. I did purchase a special glue that was supposed to be made to seal against moisture, and time will tell if it will really work! It was called Glass, Metal, and More Premium Permanent Glue by Beacon. I have to tell you that I only paid $5.99 for it at Michael’s, and then I had a 40% off coupon! They are charging $11.99 for it on Amazon, and that’s pretty unusual that it is actually MORE expensive on Amazon! I was very surprised to see that.
I decided to make a recording sheet for my kids to write the words that they find in the “wands” on the page, too, and this is a free download for you today! If you decide to “go for it” and make some wands, I hope that you and your kids enjoy it! I was thinking that perhaps this would work nicely with baby food jars, too, and that might save you the expense of buying the test tubes. But then they wouldn’t look like wands, would they?
I think that this would be a better activity over all if it were made with lower case alphabet beads, but I didn’t see any when I was shopping, and now it is too late for my project. But I think I will use this as a greater challenge for my students: I will just have them see if they can look at the word written in capitals, but see if they can write it in lower case letters!
If you liked this post, check out these other popular posts, and check out our website! And sign up for our email updates!
Common Core Literacy Centers: Phonics Spoons!
How to Do Guided Reading with Children That Cannot Yet Read
Monster Teeth Subtraction
Teaching Kindergartners to Write Paragraphs!
Teaching CVC Words: What to Do When They Are STILL Not Getting It!
How to Teach Children To Write Words Like They Sound
----------------------------------
Follow me! Did you enjoy this post? Do me a favor and share it with your friends! And follow this blog by signing up for my email updates here, or follow on Bloglovin', or follow me on TPT! I'm also on Pinterest, Facebook, Twitter, Instagram, Google+ and YouTube, too! Don't forget to sign up for our email newsletter for special deals and promo codes that you won't find out about anywhere else.