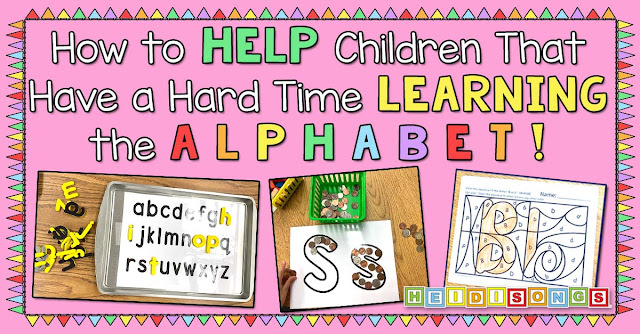
Earth Day Projects!
 |
| It's an Earth Day Car!!!! |
Earth Day Cars!
During the month of April, we started working on some Earth Day projects, and we only just finished them, so I thought I would take the time to share a little bit about them with you today. By far, the most fun project for the children was our Earth Day Cars! The BOYS were absolutely thrilled with the idea of building their own car out of recycled materials, and were practically giddy with delight when I suggested that they might enjoy painting some lightning bolts on the sides of their cars, or some tiger stripes or leopard spots! The girls were happy about the project too, but not as excited as the boys, of course!
 |
| My Earth Day Car Sample |
By far the hardest part of this project was trying to collect all of the lids that we needed for the wheels! I started MONTHS in advance, and sent home a paper asking for lids of any size or color, and I stated that I needed two lids per child. I also suggested that parents send in extras if they had any, just in case we ran short. I think that most of the lids came from just a few families! I also should have explained that I needed ROUND lids, because I did get one rectangular lid- even though the note said that they would be used as wheels for cars! (Oops!) I had originally planned this project to be part of my unit on Simple Machines for science, but it took such a long time to collect the lids that they became Earth Day cars instead. :)
 |
| Some children painted leopard spots on their cars! |
 |
| Stripes were also a popular design choice! |
We also needed one empty child's milk carton per child, so I just asked the cafeteria ladies to save me some. That was fairly easy! I had a volunteer wash them and leave them to dry overnight. Then my aide and a volunteer helped to cut the tops off of the cartons. We then measured and cut the paper to fit the cartons and just taped it on. I really didn't think that glue was going to stick to the wax covered carton, so we just decided to go with tape. Once each child's carton was covered with construction paper, then the bodies of the cars were ready to paint. I bought some bamboo skewers and cut them in half, and also cut the pointed end off of them for safety's sake. This formed the axle of the wheel.
 |
| We set the cartons on the window sill to dry. |
Painting the body of the car took some children VERY little time to complete, so I also provided some blank paper for them to paint an extra picture of their choice if they wanted to, just to keep them busy at the art center until the rest of the groups were done with their activity. The volunteer at the art center had to put their names on the bottoms of the cartons with a permanent marker.
 |
| Write names on the bottoms of the milk cartons with a permanent marker. |
 |
| Here are all of our completed cars. |
Finally, on Friday afternoon, the big moment finally came! We all got to play with our cars!!!!!! I turned the kids loose with their cars and let them roll them all over the room. A few of the kids were saying things like, "Uh... how is this a car? There are only two wheels!!!" I just said, "Well, it's an EARTH DAY car! You only NEED two wheels, so that's all you have!"
 |
| The cars with the medium sized wheels with the thickest plastic worked the best. |
The kids had a ball rolling their little cars all over the place, although some of them were a little disgusted with their wheels, since the kept falling off. The children whose cars had better wheels really lucked out, and many of them were bringing me their cars and asking for "better wheels." A bunch of them wanted me to tape the wheels on, but it took a real demonstration of why that wasn't going to work before anyone was convinced that it was a bad idea! It was actually a pretty good problem solving opportunity!

Of course, AFTER we finished all of this, I found a much better design for a car made out of recycled materials in Family Fun magazine! Check out the "How To" video that they posted on www.youtube.com!
Earth Day Trees
I originally got this idea from http://ApplesAndABCs.blogspot.com. I liked the idea so much that I decided to try it myself and see how it would come out! My aide and I decided to modify it a little bit, though, to make it work for us.
 |
| Earth Day Trees, made with cardboard tree trunks and branches. |
I am not sure if the author of the original post pre-cut the tree trunks and branches, but we decided that our kids would need help with this, so we decided to do that for them. We also glued down the tree trunk in the middle of the page to get them started in the right place. To prepare the cardboard, try to peel off the top layer to expose the corrugated part of it. Then cut it into strips, cutting one long strip for the trunk and some smaller strips for the branches.
 |
| Peel back the top layer of a piece of cardboard and then cut it into strips. |
You'll need some bottles from the Pepsi company if you want them to leave a print that looks like flowers! Otherwise, you can use any type of bottle. But we really liked the bottles from the Pepsi company in particular.
 |
| Glue down the tree trunk for each child, and let them glue down their own branches. |
Once the children finished gluing down the branches above their tree trunks, the brought their papers over to the painting station to do the painting. I put pink paint on some paper plates, and showed the children how to dip the bottles into the paint and then use them to stamp the blossoms on to the tree!

The only thing I would do differently next time is perhaps add some thing green to use to stamp on some grass, and maybe a construction paper sun in the sky. They just need a little bit more to do to fill the entire 20 minute time block that they have at the art center.

 |
| Pin me to Pinterest! |
----------------------------------
Follow me! Did you enjoy this post? Do me a favor and share it with your friends! And follow this blog by signing up for my email updates here, or follow on Bloglovin', or follow me on TPT! I'm also on Pinterest, Facebook, Twitter, Instagram, Google+ and YouTube, too! Don't forget to sign up for our email newsletter for special deals and promo codes that you won't find out about anywhere else.